
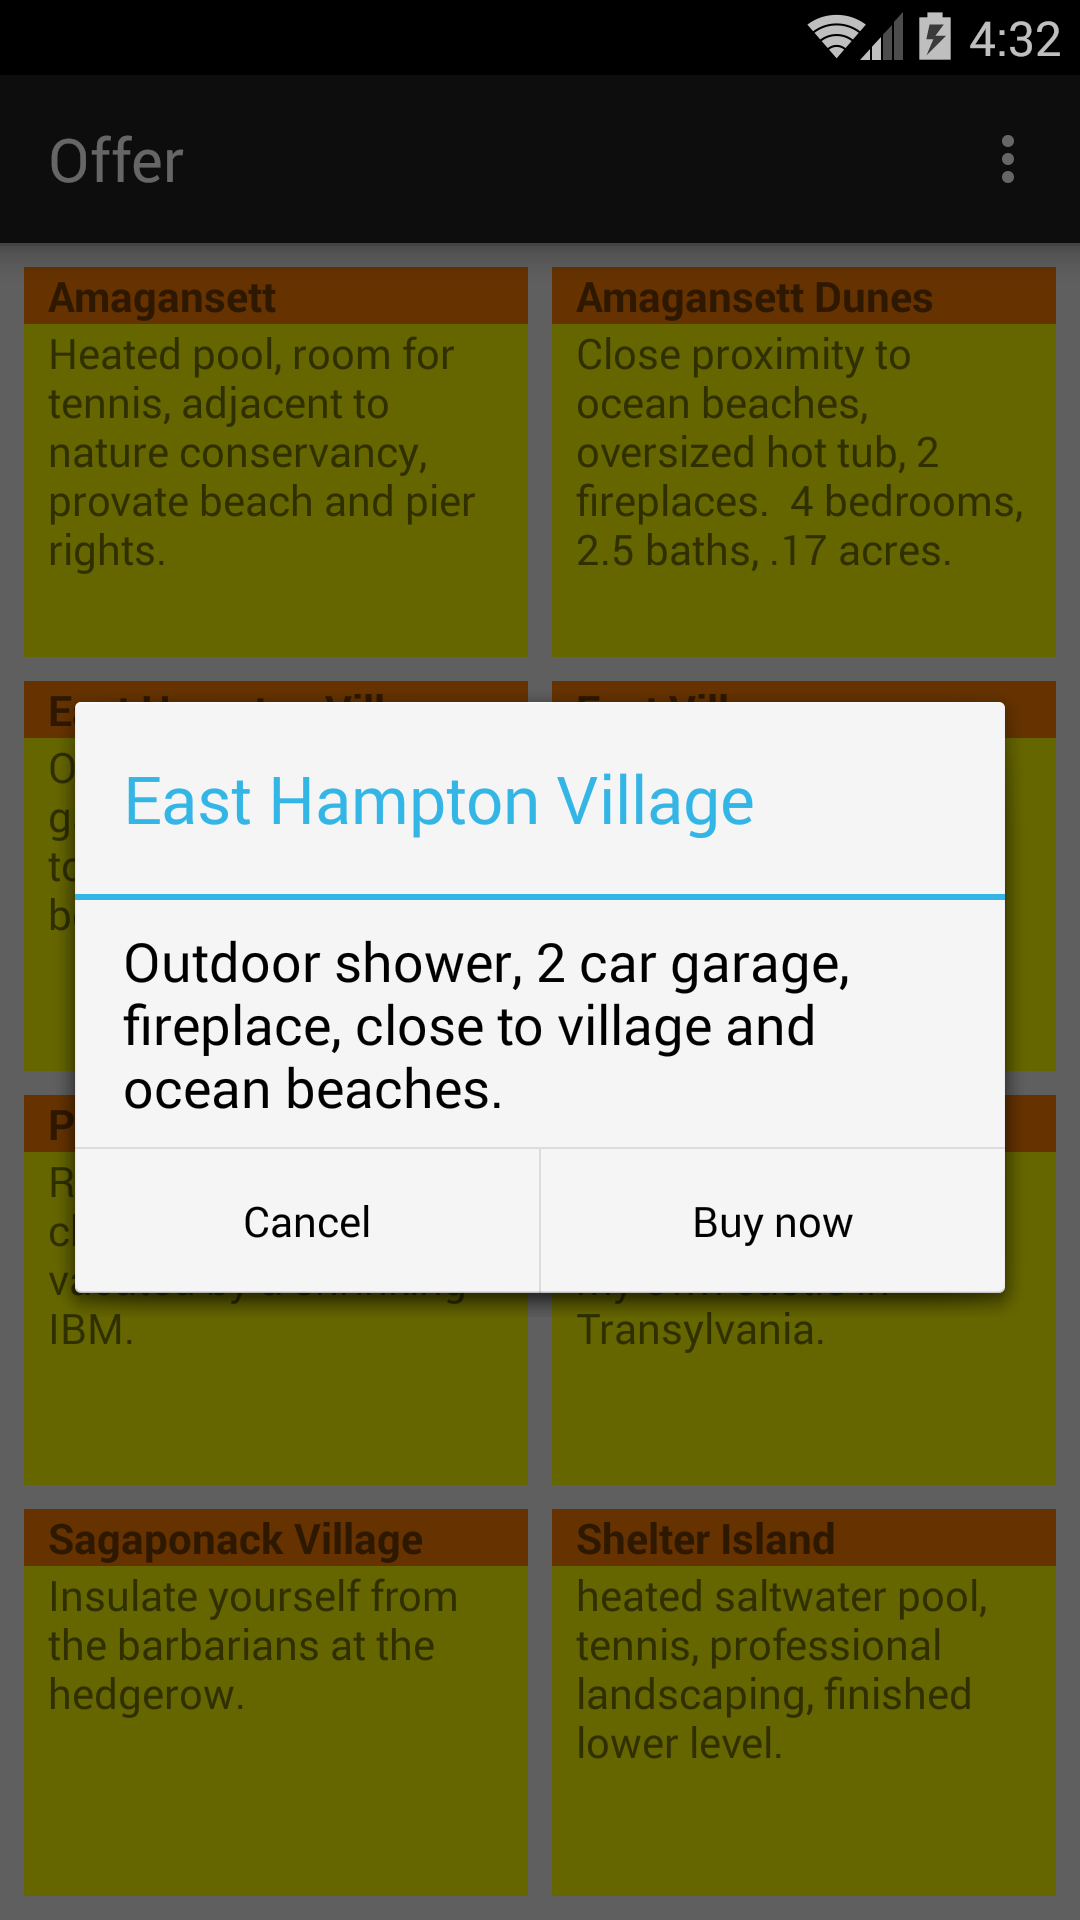

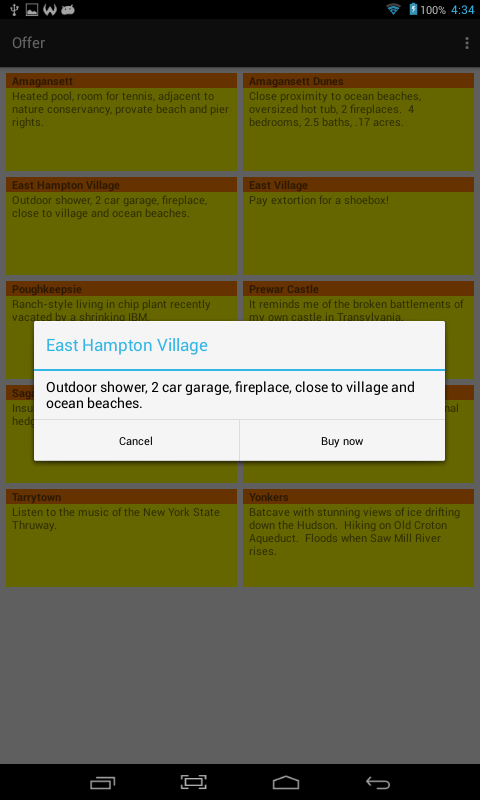

Tap on a real estate offer and pop up a
dialog box.
The buttons on the dialog don’t do anything,
but I could have plugged in a
DialogInterface.OnClickListener
(as in
TestBed)
in place of the word
null.
The first three screenshots are on a Samsung Galaxy S5.
The last two are on my 480 × 800 pixel Azpen A727 tablet.
The landscape shots show that a
TextView
doesn’t know about hyphenation.
In real life, I would not have used colors.
They’re just to show you how big the
TextViews
are.
What you want me to create from scratch for you in class
on April 11, 2015 is an app with a
GridView
displaying two columns in portrait orientation,
three columns in landscape orientation.
Each item in the
GridView
should be a
LinearLayout
whose
orientation
is vertical in portrait,
horizontal in landscape.
Each
LinearLayout
represents an “offer”
and will contain two
TextViews
named
title
and
description.
The text in the
TextView
should come from a table in an SQLite database file created with
sqlite3
before we wrote the app.
The database file could be stored inside the app as we did in
Cursor.
But I understand that you would be delighted if the file was downloaded
by the app from a server, such as the Linux Unix server
oit2.scps.nyu.edu
where this course is hosted.
Every app has had a pair of alternative dimension resource files for wide screen vs. narrow screen. This app also has a pair of groups of layout files for portrait vs. landscape. See Providing Alternative Resources.
MainActivity.java
creates a
GridView
and plugs an
adapter
and a
listener
into it.
We saw the same type of adapter in
CursorAdapter.
OpenHelper.java
is a subclass of Android’s class
SQLiteOpenHelper.
It has a method named
getReadableDatabase
which eventually gets us a
Cursor
which we can plug into the
SimpleCursorAdapter
which feeds the
GridView.
The
Cursor
reads rows from the SQLite database.
.xml
files
layout-port/activity_main.xml.
The
RelativeLayout
contains a
two-column
GridView.
layout-port/gridview_item.xml.
The vertical
LinearLayout
contains two
TextViews whose
ids
are
title
and
description.
.xml
files
layout-land/activity_main.xml.
The
RelativeLayout
contains a
three-column
GridView.
layout-land/gridview_item.xml.
The horizontal
LinearLayout
contains two
TextViews whose
ids
are
title
and
description.
strings.xml
values/dimens.xml
for narrow screen.
values-w820dp/dimens.xml
for wide screen.
strings.xml
AndroidManifest.xml
build.gradle
(Module: app).
We will edit this file when we do the
SQLiteAssetHelper
exercise.
In the Android Studio
project
view,
select the
app/res/layout
folder.
Pull down
Refactor → Rename…
Warning
Package 'layout' contains directories in libraries which cannot be renamed.
Do you want to rename current directory or all directories in project?
Rename current
Rename
Rename directory layout and its usages to:
layout-port (for “portrait”).
☑ Search in comments and strings
Refactor
In the Android Studio
project
view,
the file
activity_main.xml
should now be listed with a parenthesized
(port)
after it.
Create another file named
activity_main.xml,
this time for landscape orientation.
In the Android Studio
project
view,
select
layout
and pull down
File → New… → Layout resource file
New Resource File
File name: activity_main.xml
Root element: RelativeLayout
Screen orientation: Landscape
(This should automatically change the directory name to
layout-land.)
OK
Verify that the Android Studio
project
view
now contains two files named
activity_main.xml,
onr for (port) and one for (land).
I named the
gridview_item.xml
files after the
simple_spinner_item.xml
in
Spinner
and the
simple_list_item_1.xml
in
ListView.
In the Android Studio
project
view,
select the
layout
folder and pull down
File → New… → Layout resource file
File name: gridview_item.xml
Root element: LinearLayout
Directory name: layout-port
OK
Create another
gridview_item.xml
and put it in
layout-land.
A database file in the assets folder (or its subfolders)
must contain a table named
android_metadata.
Go to your Mac or PC Desktop and save
offers.csv
there.
The
offers
table must have three columns
(_id,
title,
description)
because the
_id
column is be required by the
Cursor.
But the
offers.csv
file has only two columns.
We must therefore import the file into a two-column table (temp),
and then copy the two-column table into a three-column table.
The
drop table
reduced the size in bytes of
offers.db
from 6144 to 5120,
and the
vacuum
did not reduce it further.
sqlite3 offers.db

sqlite> create table android_metadata (
	"locale" text default "en_US"
);
sqlite> .schema android_metadata

sqlite> insert into android_metadata (locale) values ("en_US");
sqlite> .dump android_metadata

sqlite> create table temp (
	title text,
	description text
);
sqlite> .schema temp

sqlite> .separator @
sqlite> .show
sqlite> .import offers.csv temp
sqlite> select count(*) from temp;
sqlite> .separator |
sqlite> select * from temp;

sqlite> alter table temp add column _id integer primary key autoincrement;
Error: Cannot add a PRIMARY KEY column

sqlite> create table offers (
	_id integer primary key autoincrement,
	title text,
	description text
);
sqlite> .schema offers

sqlite> insert into offers (title, description) select * from temp;
sqlite> select count(*) from offers;
sqlite> select * from offers;

sqlite> drop table temp;
sqlite> .tables
sqlite> vacuum;
sqlite> .quit
The SQLite database file that the
OpenHelper
reads with the
AssetManager
must be in the assets folder in the Android Studio
project
view.
Select the app folder at the top of the
project
view.
Pull down
File → New → Folder → Assets Folder
Finish
On Mac, I right-clicked on
offers.db
and selected Copy “offers.db”.
Then I right-clicked on the assets folder
in the Android Studio
project
view
and selected Paste.
In the Android Studio
project
view,
select the
app/java/edu.nyu.scps.offer
folder and pull down
File → New… → Java Class
Create New Class
Name: OpenHelper
Kind: Class
OK
In the new file
OpenHelper.java,
add the words
extends SQLiteOpenHelper.
Click on the word
OpenHelper
and pull down
Code → Implement Methods…
and press OK.
Also pull down
Code → Generate…
and select Constructor.
TextView
hyphenate?
insert,
delete,
and/or
update
commands while the ap is running.
Shouldn’t the “h” be uppercase in the
description
of the Shelter Island offer?
And “private” is spelled wrong in Amagansett.
After repairing the database by running
sqlite3
on the emulator or device,
change the orientation to make the app re-read the database.
adb devices
List of devices attached
ca1784a34445a8d0308	device
192.168.56.101:5555	device

adb devices -l
List of devices attached
ca1784a34445a8d0308    device usb:24100000 product:polaris_inet model:A727 device:polaris-inet
192.168.56.101:5555    device product:vbox86p model:Samsung_Galaxy_S5___4_4_4___API_19___1080x1920 device:vbox86p

adb -s 192.168.56.101:5555 shell

root@vbox86p:/ # cd /data/data/edu.nyu.scps.offer/databases

root@vbox86p:/data/data/edu.nyu.scps.offer/databases # pwd
/data/data/edu.nyu.scps.offer/databases

root@vbox86p:/data/data/edu.nyu.scps.offer/databases # ls -l
-rw------- u0_a64   u0_a64       5120 2015-04-09 10:02 offers.db
-rw------- u0_a64   u0_a64       1544 2015-04-09 10:02 offers.db-journal

root@vbox86p:/data/data/edu.nyu.scps.offer/databases # sqlite3 offers.db
sqlite> .dump

sqlite> update offers set description = replace(description, "provate", "private") where title = "Amagansett";
sqlite> select * from offers where title = "Amagansett";

sqlite> .quit
root@vbox86p:/data/data/edu.nyu.scps.offer/databases # exit
getReadableDatabase
in
onCreate
copies the database file into the directory
/data/data/edu.nyu.edu.offer/databases
on the emulator or device,
and then opens it.
Since the copying and opening might take several seconds,
we shouldn’t do it in the UI (user interface) thread.
We’ll create a second thread to do this work.
The second threads in
Pong
and
Pearl
did not attempt to communicate with the UI thread,
but our second thread will have to create the adapter and plug it into the
GridView
when the copying and opening are complete.
See
Worker
Threads.
Change
onCreate
to the following.
    @Override
    protected void onCreate(Bundle savedInstanceState) {
        super.onCreate(savedInstanceState);
        setContentView(R.layout.activity_main);
        final GridView gridView = (GridView)findViewById(R.id.gridView);

        final OpenHelper helper = new OpenHelper(this, "offers.db");
        Runnable runnable1 = new Runnable() {
            @Override
            public void run() {
                Thread thread = Thread.currentThread();
                Log.d("myTag", "runnable1 " + thread.getId() + " " + thread.getName());
                final SQLiteDatabase database = helper.getReadableDatabase();

                Runnable runnable2 = new Runnable() {
                    @Override
                    public void run() {
                        Thread thread = Thread.currentThread();
                        Log.d("myTag", "runnable2 " + thread.getId() + " " + thread.getName());
                        String select = "select * from offers order by title;";
                        Cursor cursor = database.rawQuery(select, null);
                        cursor.moveToFirst();

                        SimpleCursorAdapter adapter = new SimpleCursorAdapter(
                                MainActivity.this,
                                R.layout.gridview_item,
                                cursor,
                                new String[] {"title",    "description"},
                                new int[]    {R.id.title, R.id.description},
                                0   //don't need flags
                        );

                        gridView.setAdapter(adapter);
                    }
                };

		//gridView.post(runnable2); //Never ran the run method of runnable2.
                MainActivity.this.runOnUiThread(runnable2);
            }
        };

        Thread thread = new Thread(runnable1);
        thread.start();

        gridView.setOnItemClickListener(new AdapterView.OnItemClickListener() {
            @Override
            public void onItemClick(AdapterView<?> parent, View view, int position, long id) {
                Cursor cursor = (Cursor)parent.getItemAtPosition(position); //downcast
                int titleIndex = cursor.getColumnIndex("title");
                String title = cursor.getString(titleIndex);
                int descriptionIndex = cursor.getColumnIndex("description");
                String description = cursor.getString(descriptionIndex);

                //The builder will build the dialog.
                AlertDialog.Builder builder = new AlertDialog.Builder(MainActivity.this);

                //Tell the builder about the dialog you want it to create.
                builder.setTitle(title);
                builder.setMessage(description);
                //null because we want the buttons to do nothing
                //except dismiss the dialog.
                builder.setNegativeButton("Cancel", null);
                builder.setPositiveButton("Buy now", null);

                //Now that you've finished describing the dialog,
                //tell the builder to create it.
                AlertDialog alertDialog = builder.create();
                alertDialog.show();
            }
        });
    }
04-09 19:21:32.636    3196-3211/? D/myTag: runnable1 156 Thread-156
04-09 19:21:36.436    3196-3196/? D/myTag: runnable2 1 main
runOnUiThread
is adequate for our app.
But I want to show you a way to execute a given
Runnable
on any thread you choose,
not just on the UI thread.
In the following
onCreate,
runnable2
will be executed by whichever thread created
handler.
In this example, the thread that created
handler
is the UI thread.
    @Override
    protected void onCreate(Bundle savedInstanceState) {
        super.onCreate(savedInstanceState);
        setContentView(R.layout.activity_main);
        final GridView gridView = (GridView)findViewById(R.id.gridView);

        final OpenHelper helper = new OpenHelper(this, "offers.db");
        final Handler handler = new Handler();
        Runnable runnable1 = new Runnable() {
            @Override
            public void run() {
                Thread thread = Thread.currentThread();
                Log.d("myTag", "runnable1 " + thread.getId() + " " + thread.getName());
                final SQLiteDatabase database = helper.getReadableDatabase();

                Runnable runnable2 = new Runnable() {
                    @Override
                    public void run() {
                        Thread thread = Thread.currentThread();
                        Log.d("myTag", "runnable2 " + thread.getId() + " " + thread.getName());
                        String select = "select * from offers order by title;";
                        Cursor cursor = database.rawQuery(select, null);
                        cursor.moveToFirst();

                        SimpleCursorAdapter adapter = new SimpleCursorAdapter(
                                MainActivity.this,
                                R.layout.gridview_item,
                                cursor,
                                new String[] {"title",    "description"},
                                new int[]    {R.id.title, R.id.description},
                                0   //don't need flags
                        );

                        gridView.setAdapter(adapter);
                    }
                };

                handler.post(runnable2);
            }
        };

        Thread thread = new Thread(runnable1);
        thread.start();

        gridView.setOnItemClickListener(new AdapterView.OnItemClickListener() {
            @Override
            public void onItemClick(AdapterView<?> parent, View view, int position, long id) {
                Cursor cursor = (Cursor)parent.getItemAtPosition(position); //downcast
                int titleIndex = cursor.getColumnIndex("title");
                String title = cursor.getString(titleIndex);
                int descriptionIndex = cursor.getColumnIndex("description");
                String description = cursor.getString(descriptionIndex);

                //The builder will build the dialog.
                AlertDialog.Builder builder = new AlertDialog.Builder(MainActivity.this);

                //Tell the builder about the dialog you want it to create.
                builder.setTitle(title);
                builder.setMessage(description);
                //null because we want the buttons to do nothing
                //except dismiss the dialog.
                builder.setNegativeButton("Cancel", null);
                builder.setPositiveButton("Buy now", null);

                //Now that you've finished describing the dialog,
                //tell the builder to create it.
                AlertDialog alertDialog = builder.create();
                alertDialog.show();
            }
        });
    }
04-10 10:27:13.950    5652-5669/? D/myTag: runnable1 117 Thread-117
04-10 10:27:14.442    5652-5652/? D/myTag: runnable2 1 main
Runnables
are hard to read because they are nested.
Here’s a way to have a second thread without any nesting.
See
Using
AsyncTask.
    @Override
    protected void onCreate(Bundle savedInstanceState) {
        super.onCreate(savedInstanceState);
        setContentView(R.layout.activity_main);

        //Get the database in a second thread.
        //Then create the Cursor and CursorAdapter, and plug the latter into the GridView,
        //in the UI thread.
        GetReadableDatabaseTask getReadableDatabaseTask = new GetReadableDatabaseTask();
        getReadableDatabaseTask.execute("arg of execute");

        final GridView gridView = (GridView)findViewById(R.id.gridView);

        gridView.setOnItemClickListener(new AdapterView.OnItemClickListener() {
            @Override
            public void onItemClick(AdapterView<?> parent, View view, int position, long id) {
                Cursor cursor = (Cursor)parent.getItemAtPosition(position); //downcast
                int titleIndex = cursor.getColumnIndex("title");
                String title = cursor.getString(titleIndex);
                int descriptionIndex = cursor.getColumnIndex("description");
                String description = cursor.getString(descriptionIndex);

                //The builder will build the dialog.
                AlertDialog.Builder builder = new AlertDialog.Builder(MainActivity.this);

                //Tell the builder about the dialog you want it to create.
                builder.setTitle(title);
                builder.setMessage(description);
                //null because we want the buttons to do nothing
                //except dismiss the dialog.
                builder.setNegativeButton("Cancel", null);
                builder.setPositiveButton("Buy now", null);

                //Now that you've finished describing the dialog,
                //tell the builder to create it.
                AlertDialog alertDialog = builder.create();
                alertDialog.show();
            }
        });
    }

    private class GetReadableDatabaseTask extends AsyncTask<String, Void, SQLiteDatabase> {

        //This method is executed by the second thread.
        //It gets its arguments from the execute method of GetReadableDatabaseTask.
        //Its return value is passed as an argument to onPostExecute.

        @Override
        protected SQLiteDatabase doInBackground(String... args) {
            Thread thread = Thread.currentThread();
            Log.d("myTag", "doInBackground " + args[0] + " " + thread.getId() + " " + thread.getName());
            OpenHelper helper = new OpenHelper(MainActivity.this, "offers.db");
            return helper.getReadableDatabase();
        }

        //This method is executed by the UI thread when doInBackground has finished.
        //Its argument is the return value ofDoInBackground.

        @Override
        protected void onPostExecute(SQLiteDatabase database) {
            Thread thread = Thread.currentThread();
            Log.d("myTag", "onPostExecute " + thread.getId() + " " + thread.getName());
            useTheDatabase(database);
        }
    }

    //This method of the Activity is called by onPostExecute.
    //It is executed by the UI thread after the second thread has finished.

    private void useTheDatabase(SQLiteDatabase database) {
        String select = "select * from offers order by title;";
        Cursor cursor = database.rawQuery(select, null);

        SimpleCursorAdapter adapter = new SimpleCursorAdapter(
                MainActivity.this,
                R.layout.gridview_item,
                cursor,
                new String[] {"title",    "description"},
                new int[]    {R.id.title, R.id.description},
                0   //don't need flags
        );

        GridView gridView = (GridView)findViewById(R.id.gridView);
        gridView.setAdapter(adapter);
    }
SQLiteOpenHelper,
we could have used a subclass named
SQLiteAssetHelper
that has already been written for us by a third party.
Download this class from GitHub.
Remove the
OpenHelper.java
file from the project by selecting it in the Android Studio
project
view
and choosing Delete….
Replace it with the following file
AssetHelper.java.
Admire how much simpler it is than
OpenHelper.java.
package edu.nyu.scps.offer;

import android.content.Context;
import com.readystatesoftware.sqliteasset.SQLiteAssetHelper;


public class AssetHelper extends SQLiteAssetHelper {
    public AssetHelper(Context context, String filename) {
        super(context, filename, null, 1);	//1 is the database version number
    }
}
Add a third dependency to the two we already have in
build.gradle (Module app).
dependencies {
    compile fileTree(dir: 'libs', include: ['*.jar'])
    compile 'com.android.support:appcompat-v7:22.2.0'
    compile 'com.readystatesoftware.sqliteasset:sqliteassethelper:+'
}
In the
doInBackground
method of the
AsyncTask,
change the
helper
from
OpenHelper helper = new OpenHelper(this, "offers.db");
to
AssetHelper helper = new AssetHelper(this, "offers.db");
The
.db
file read by an
SQLiteAssetHelper
must be in the
databases
subfolder of the assets folder.
To create this subfolder,
right-click on the asserts folder in the Android Studio
project
view
and select
New → Folder → Assets Folder
Click on Change Folder Location
New Folder Location: src/main/assets/databases
Finish
Then paste the
.db
file into the new
databases
subfolder.
.db
file from a server.
Replace the
AssetHelper
with the original
OpenHelper.
Change the
overwrite
method of the
OpenHelper
to the following.
    //Overwrite the .db file /data/data/projectname/databases/filename
    //with a .db file downloaded from the Linux Unix server oit2.scps.nyu.edu.

    private void overwrite() {
        InputStream inputStream = null;
        OutputStream outputStream = null;
        try {
            URL url = new URL("http://oit2.scps.nyu.edu/~meretzkm/INFO1-CE9705/src/offer/offers.db");
            URLConnection connection = url.openConnection();
            inputStream = new BufferedInputStream(connection.getInputStream());
            outputStream = new FileOutputStream(getDatabaseName());
            byte[] buffer = new byte[1024];
            int length;

            //Copy the inputfile to the outputfile.
            while ((length = inputStream.read(buffer)) > 0) {
                outputStream.write(buffer, 0, length);
            }
        } catch (MalformedURLException exception) {
            Toast.makeText(context, "malformed URL: " + exception, Toast.LENGTH_LONG).show();
        } catch (IOException exception) {
            Toast.makeText(context, "IO exception: " + exception, Toast.LENGTH_LONG).show();
        } finally {
            try {
                if (inputStream != null) {
                    inputStream.close();
                }
                if (outputStream != null) {
                    outputStream.close();
                }
            } catch (IOException exception) {
                Toast.makeText(context, "Couldn't close file: " + exception, Toast.LENGTH_LONG).show();
            }
        }
    }
In
AndroidManifest.xml,
add the following element to the
manifest
element immediately before the
application
element.
<uses-permission android:name="android.permission.INTERNET"/>
And make sure you’ve already done the thread exercises.
Otherwise
LogCat
will give you a red error message
“Caused by: android.os.NetworkOnMainThreadException”.