In the
JavaScript
project,
the view controller created a
UIWebView
that displayed a Google map.
In the current project,
the view controller creates a
MKMapView,
which is a subclass of
UIView
specialized for displaying one Google map.
The map fills the
MKMapView,
so it doesn’t need a
backgroundColor.
The view controller also creates a
CLLocationManager,
which uses a lot of electricity and finds your current location.
The view controller acts as the
delegate
of the
CLLocationManager.
When the
CLLocationManager
figures out where you are,
the
locationManager:didUpdateToLocation:fromLocation:
method of the
delegate
is called.
This method receives a
CLLocation
object containing the latitude, longitude, altitude, accuracy, etc.
(Check out the other interesting methods of the
delegate.)
See
Getting the User’s Location.
The
locationManager:didUpdateToLocation:fromLocation:
method turns off the
CLLocationManager
to save electricity.
It then tells the map to display a 100-meter-wide region containing
the current location.
With our 2:3 aspect ratio (320 × 480 pixel pairs on an iPhone),
the region should be 150 meters from north to south.
locationManager:didUpdateToLocation:fromLocation:
also asks the
CLGeocoder
to look up the street address of the location.
See
Converting Coordinates into Place Name Information.
When the address is found, the
CLGeocoder
executes the
^{block}
of code passed as the second argument of
reverseGeocodeLocation:completionHandler:.
We saw our first block
here.
This block creates an
MKAnnotation
and puts it into the map.
An
MKAnnotation
can be anything that has a
title,
subtitle,
and
latitude
and longitude.
For example,
the
Pin
object I created is the simplest kind of
MKAnnotation.
Note that the pin looks like an Apple pin,
not a Google Maps pin.
See
Annotating
Maps.
main.mMapAppDelegateViewController
creates the
MKMapView,
the
CLLocationManager,
and the
CLGeocoder.Pin
adopts the
MKAnnotation
protocol.Map-Info.plist
Class
ViewController
is a subclass of class
UIViewController.
Class
Pin
is a subclass of class
NSObject.
ViewController.h
imports the header files
CoreLocation.h
and
MapKit.h.
Pin.h
imports the header file
MapKit.h.
Add the
CoreLocation.framework
and the
MapKit.framework
to the project.
See
Gone
for adding a framework to the project.
Allow the app to run only on a device that has the required device capabilities.
In the Project Navigator pane of Xcode, open the Supporting Files folder
and open the file
Map-Info.plist.
Select
Required
device capabilities
and add a new line for
location-services.
See
Requiring
the Presence of Location Services.
If you are running in the Simulator,
System Preferences… →
Personal →
Security
and enable location services.
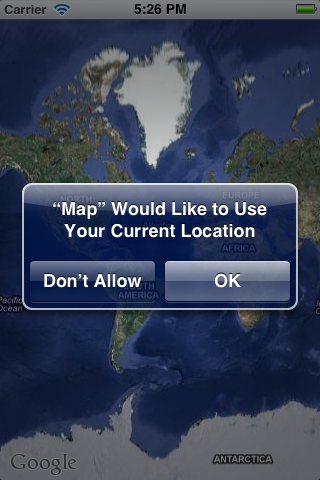
“Map” Would Like to Use
Your Current Location.
Don’t Allow/OK
Press OK.
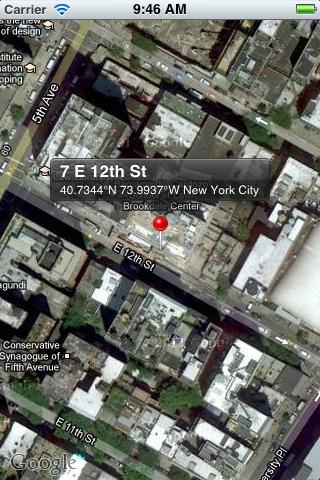
By default, the simulator believes you’re at the Apple Store at the San Francisco State University Downtown Campus, at Latitude 37.785834° North, Longitude 122.406417° West. (A negative longitude is West.) Tap the red pin to display its title and subtitle. Double tap or spread to zoom in, pinch to zoom out. To pinch the simulator, hold down the option key while dragging.
2012-08-03 09:23:22.380 Map[57896:207] locationManager:didUpdateToLocation:fromLocation: Lat 37.785834° Long -122.40641°
2012-08-03 09:23:22.509 Map[57896:207] placemark == Apple Store, San Francisco, Apple Store, San Francisco, 1 Stockton St, San Francisco, CA  94108-5805, United States @ <+37.78584540,-122.40651750> +/- 100.00m, region (identifier <+37.78584545,-122.40652161> radius 18.96) <+37.78584545,-122.40652161> radius 18.96m
http://maps.googleapis.com/maps/api/geocode/json?address=7+East+12th+Street,+New+York,+NY&sensor=falsePositive latititude is north of the equator; negative longitude is west of the prime meridian.
"location" : {
               "lat" : 40.73448420,
               "lng" : -73.99365349999999
            },
etc.
In the Scheme dropdown menu in the upper left of Xcode, select
Map > iPhone 6.0 Simulator
(or whatever your version is.)
Then click on the word
Map >
and select
Edit Scheme….
In the left panel, select
Run Map.app.
In the top bar, select
Options.
Default Location
to
None
and press
OK.
Then pull down the
Debug
menu of the simulator and select
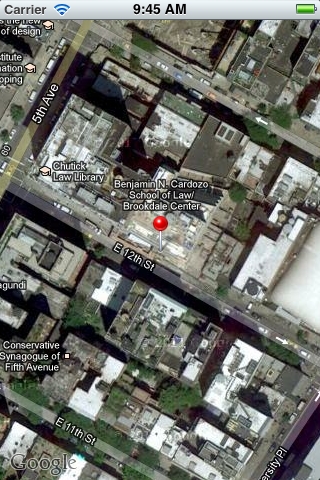
Debug → Location → Custom Location…
Enter a latitude and longitude for the location
you would like to simulate.
Latitude: 40.7343890
Longitude: -73.9937460
OK
You may have to Quit iOS Simulator get make the new location take effect.
2012-08-03 09:45:04.197 Map[76866:207] locationManager:didUpdateToLocation:fromLocation: Lat 40.734389° Long -73.99374°
2012-08-03 09:45:04.394 Map[76866:207] placemark == 7 E 12th St, 7 E 12th St, New York, NY  10003-4475, United States @ <+40.73453300,-73.99366490> +/- 100.00m
See Location Simulation. You can specify a GPX file as the Default Location.
MKMapView
becomes visible and displays a world map
before it is given the location to display.
Keep the
MKMapView
hidden
until you give a value to the
region
property of the
MKMapView.
Even if the
MKMapView
is hidden, it will still display the
“Map” Would Like to Use
Your Current Location
action sheet.
region
property has been given a value,
it may still take some time until the map has finished downloading from Google
into the
MKMapView.
I wish I could ask you to keep the
MKMapView
hidden
until the
mapViewDidFinishLoadingMap:
method of the
MKMapView’s
delegate
is called.
(Let the view controller
be the
MKMapView’s
delegate.
The view controller
is now the delegate for two different objects.)
But when I run the app on the simulator,
mapViewDidFinishLoadingMap:
is called only the first time the map is downloaded loaded from Google.
Even if I erase the app from the simulator, and quit the simulator,
and quit Xcode itself,
and then re-launch Xcode,
mapViewDidFinishLoadingMap:
is not called when I run the app again.
The tiles of the map appear anyway,
which means they are being cached somewhere.
In other words, the purpose (or at least the usefulness) of
mapViewWillStartLoadingMap:
and
mapViewDidFinishLoadingMap:
is not to tell us when all the tiles have been downloaded.
(The tiles have probably
already
been downloaded.)
Their purpose is to delimit the interval of time
during which we have to stay connected to the Internet.
To verify this theory,
let the view controller be the delegate of the
MKMapView
object.
The view controller
will have to adopt the
MKMapViewDelegate
protocol, and the
delegate
property of the
MKMapView
will have to point to the view controller.
Then run the app again,
but with a location that is one degree farther north.
In
locationManager:didUpdateToLocation:fromLocation:,
change the second argument of
MKCoordinateRegionMakeWithDistance
from
newLocation.coordinate
to
	CLLocationCoordinate2DMake(
		newLocation.coordinate.latitude + 1,
		newLocation.coordinate.longitude
	)
Run the app again and you’ll see that
mapViewDidFinishLoadingMap:
is called.
Run the app yet again and
mapViewDidFinishLoadingMap:
is not called.
MKMapView
has a
delegate,
we no longer have to use the default picture (a red pushpin)
for the
annotation.
Get an image (Apple prefers png, but jpg will do)
with a transparent background and add it to the project.
A ragged example is
nyu.png.
I made the white background transparent using the form in
this page.
Add the image file to the project.
Add the following method to the
MKMapViewDelegate
(which is the view controller).
For simplicity,
it always returns an annotation view with exactly the same picture.
#pragma mark -
#pragma mark Protocol MKMapViewDelegate

- (MKAnnotationView *) mapView: (MKMapView *) v
	viewForAnnotation: (id <MKAnnotation>) annotation {

	MKAnnotationView *v = [[MKAnnotationView alloc]
		initWithAnnotation: annotation reuseIdentifier: nil];

	v.image = [UIImage imageNamed: @"nyu.png"];
	return v;
}
Even better, reuse an existing
MKAnnotationView
instead of creating a new one with every call to
mapView:viewForAnnotation:.
CLLocation
received by the
location
manager delegate
contains more than just a latitude and longitude.
It also contains an
accuracy
in meters.
Create a subclass of
MKAnnotationView
with a
drawRect:
method that will draw a circle whose radius is the accuracy.
See the Overview at the top of
this
page.
Tell the
mapView:viewForAnnotation:
method to instantiate an object of this new class
instead of instantiating a plain vanilla
MKAnnotationView.
MKPolygon
and its
PolygonView.
Let’s make one that is a purple rectangle covering the NYU campus.
Add the following instance variable to the view controller:
MKPolygon *polygon;
Initialize it and add it to the
MKMapView
at the end of the
loadView
method of the view controller.
(To get the latitudes and longitudes from Google Maps,
use the
plotter
in
Manhattan.)
	//Latitude and longitude of the four corners of NYU campus:

	CLLocationCoordinate2D coordinates[] = {
		{40.728804, -73.99500},		//West 4th St. & Mercer St.
		{40.730978, -73.999625},	//West 4th St. & MacDougal St.
		{40.730438, -74.000092},	//West 3rd St. & MacDougal St.
		{40.728202, -73.99555}		//West 3rd St. & Mercer St.
	};
	const size_t count = sizeof coordinates / sizeof coordinates[0];

	polygon = [MKPolygon polygonWithCoordinates: coordinates count: count];
	[(MKMapView *)self.view addOverlay: polygon];
Add the following method to the view controller.
#pragma mark -
#pragma mark Protocol MKMapViewDelegate

- (MKOverlayView *) mapView: (MKMapView *) v
	viewForOverlay: (id <MKOverlay>) overlay {

	MKPolygonView *view = [[MKPolygonView alloc] initWithPolygon: polygon];
	view.fillColor = [UIColor purpleColor];
	return view;
}
Build and run. Swipe over to the Washington Square campus of NYU and see if it’s covered by a purple rectangle. Then make the rectangle half-transparent (α = ½). Use the official shade of NYU purple:
	//excerpt from mapView:viewForOverlay:

	view.fillColor = [UIColor
		colorWithRed: 82 / 250.0
		green: 6 / 255.0
		blue: 145 / 255.0
		alpha: .5
	];
You can do more than just specify the
fillColor
of the overlay view.
See the other properties inherited from class
MKOverlayPathView.
There are other types of overlays and overlay views. See the Map Kit.
| Class that adopts the
MKOverlay Protocol |
Class derived from class
MKOverlayPathView |
|---|---|
MKPolygon |
MKPolygonView |
MKCircle |
MKCircleView |
MKPolyline |
MKPolylineView |