
The
Notification Center
app was able to detect a change of orientation.
The present app will also be able to make the text run in the correct direction.
The app’s
view
controller
object knows the orientation of the device,
and the
view
object will get this information from the view controller.
The view controller and its view contain references to each other.
- Class
AppDelegate:
unchanged.
- Class
ViewController:
added methods
loadView
and
supportedInterfaceOrientations.
- Class
View:
I added the
init
called by the
loadView
method of the view controller.
To get the project to compile and link,
I also had to add the
init
that takes an
NSCoder.
Info.plist:
has four supported interface orientations.
Create the project
Class
View
is a subclass of class
UITextView,
as in these apps:
TextView,
Swipe.
Edit the file
ViewController.swift.
In the Project Navigator of Xcode,
highlight the name of the project
(the top item,
ViewController).
In the center panel,
under Deployment Info,
check the checkbox for Device Orientation Upside Down.
You will also have to give the
supportedInterfaceOrientations
method to the view controller.
The view controller and its view contain references to each other.
A view controller has always had a reference named
view
to the the view underneath it,
although we have never used this reference.
Now we will give the view a reference named
viewController
to the view controller above it.
These references will allow the view controller and its view
to use each other’s properties cand all each other’s methods.
By default,
the view controller implicitly calls the view’s
init
method whose parameter is a reference to an
NSCoder.
I created a second
init
method whose parameter is a reference to the view controller,
and which stores this parameter in a property.
To get the view controller to create the view by calling this second method,
I had to give the view controller an explicit
loadView
method in
ViewController.swift.
This
loadView
stores a refernce to the newly-created view in the
view
property of the view controller.
The
drawRect(_:)
method of the view is called whenever the device’s orientation changes.
The view now has a reference to the view controller,
and
drawRect(_:)
can use this reference to access the properties and call the methods of the
view controller.
A
view
under the control of an iOS 8
view controller
occupies the full screen,
and the status bar on top of it has a transparent background.
(In iOS 6 and earlier,
the view did not extend to the region occupied by the status bar.)
I started the text in the view
with an empty line
("\n")
to prevent any text from being written behind the status bar.
MVC:
model-view-controller
This app redraws itself by calling the
drawRect(_:)
method of the
View
whenever the device is moved to a new orientation:
portrait,
landscape,
portrait upside down,
etc.
The machinery that calls
drawRect(_:)
belongs to an object called the
view controller,
or
controller
for short.
The controller has a property called
interfaceOrientation.
Whenever the controller senses that this property has changed,
the controller will ensure that someone calls
the
drawRect:
method of the view that is controlled by the controller.
In the future,
I promise that the controller will respond to changes in something much
more substantial than
interfaceOrientation,
which is one of the controller’s own properties.
The controller will respond to changes in a separate object called the
model,
which can be a formidable repository of data.
When the data in the model changes,
the controller will see to it that
drawRect:
is called.
Data will also flow in the opposite direction.
The controller will sense
when the buttons and sliders in the view have received data from the user.
The controller will then transmit this data to the model.
For the present,
however,
the flow of data is only one way,
from the controller down to the view.
We saw
an example
where a little yellow view was
added
to a big white view.
We could have provided a view controller for that big white view
but not for the little yellow view.
A little view that has been
added
to another view does not have a view controller of its own.
The application delegate creates the view controller.
Instead of creating a
view
and a
window,
this
app delegate
creates a
window
and a
view
controller.
The
view
controller
will create the
view.
In fact,
the
controller
will be the
view’s
lifelong guardian angel.
At any given time, a controller controls only one view.
The application delegate has a propery variable named
window
that points to the window.
The window has a property named
rootViewController
that points to the controller.
The controller has a property named
view
that points to the view.
Make a diagram of this on a piece of paper.
The view controller creates the view.
The controller’s
view
is created by the
loadView
method of the controller.
loadView
creates the view and stores the address of the view into the
view
property of the controller.
The code in
loadView
is familiar code that until now has been in
application:didFinishLaunchingWithOptions:.
loadView
is called automatically the first time the value of the controller’s
view
property is used.
For example,
the method
application:didFinishLaunchingWithOptions:
could have triggered a call to
loadView
with the following mention of
viewController.view.
loadView
would have been called immediately before the value of
viewController.view
was used as a parameter of
addSubview:.
		ViewController *viewController = [[ViewController alloc] initWithNibName: nil bundle: nil];
		[self.window addSubview: viewController.view];
Instead of the above two statements,
application:didFinishLaunchingWithOptions:
accomplished the same thing with the following statement.
See the documentation for
rootViewController.
self.window.rootViewController = [[ViewController alloc] initWithNibName: nil bundle: nil];
The controller and the view have pointers to each other.
The view controller and the view contain instance variables or properties
that point to each other.
The
view
property of the
ViewController
object,
inherited from class
UIViewController,
points down to the
View
object.
Conversely, the
viewController
instance variable of the
View
object points up to the
ViewController
object.
This instance variable allows the
View
object to send messages to the
ViewController
object.
It has to be a
__weak
pointer (two underscores)
to allow the view to die before the view controller.
Otherwise, the view and the view controller will keep each other alive forever
and we’d have a memory leak.
In our view controller, the
interfaceOrientation
propery has one of the four possible values of the data type
UIInterfaceOrientation.
Just between you and me,
this data type is basically an
int,
and the four values are basically 1, 2, 3, 4.
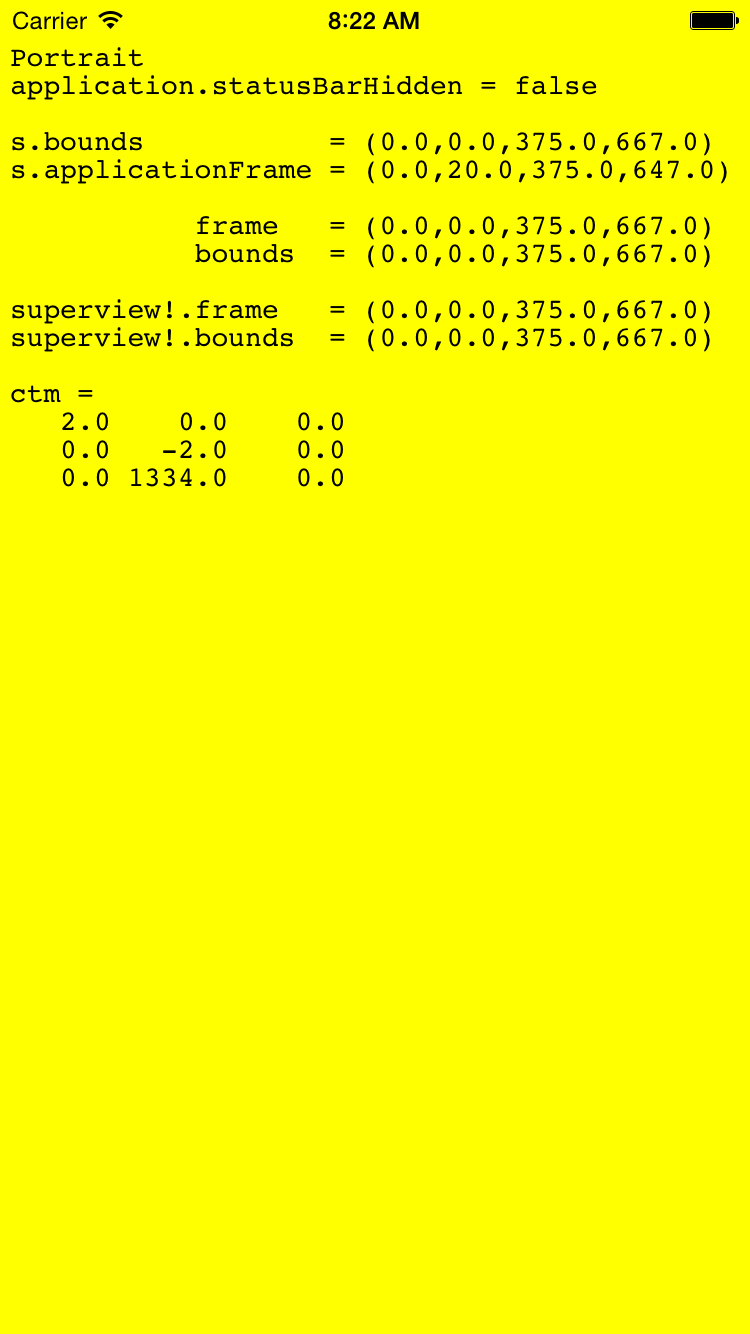
The initial orientation is
portrait.
The
View’s
superview
is the
window.
The
frame
and
bounds
of the
window
remain serenely unaffected by the change in orientation.
The Macintosh origin is in the lower left corner of the screen,
with the Y axis pointing up.
The iPhone origin is in the upper left corner of the screen,
with the Y axis pointing down.
The
CTM
agrees with the view’s
bounds.
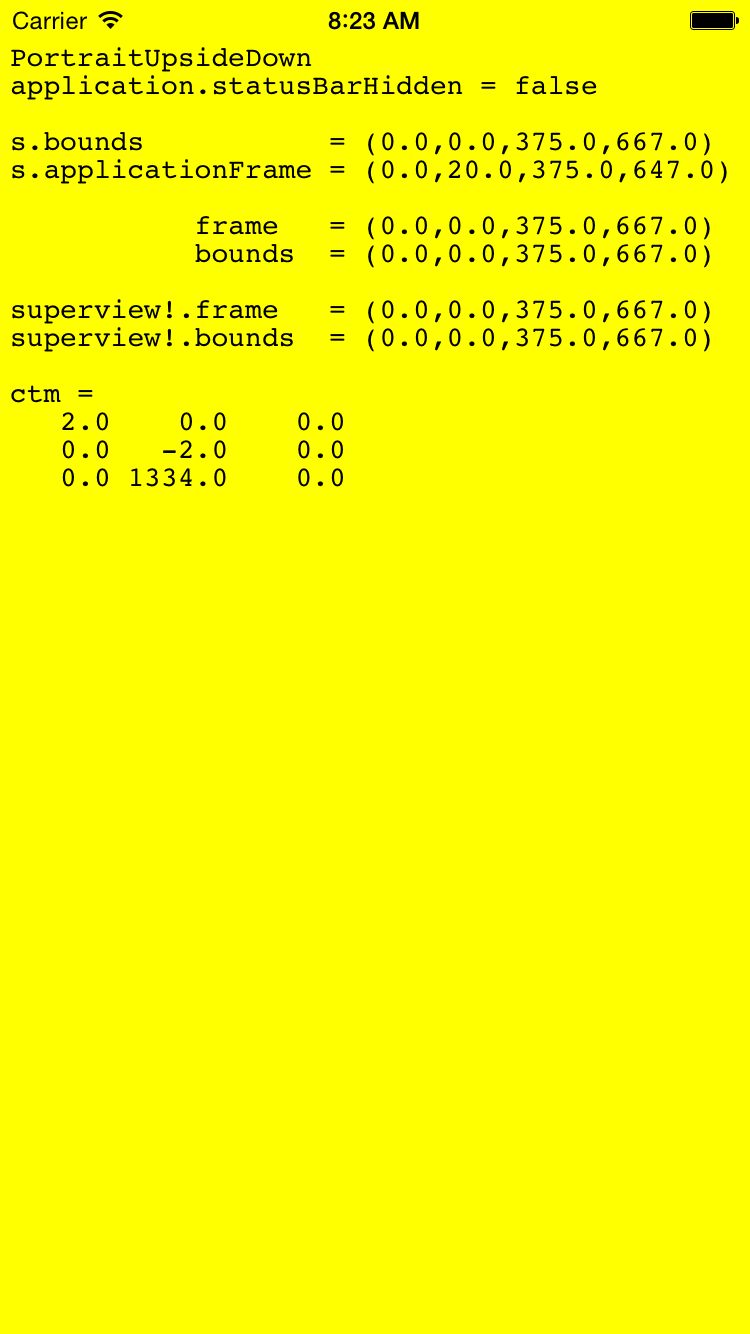
The
CTM
for
Portrait
and
PortraitUpsideDown
means
“flip it upside down, double the coördinates,
and add 640 to the
y.”
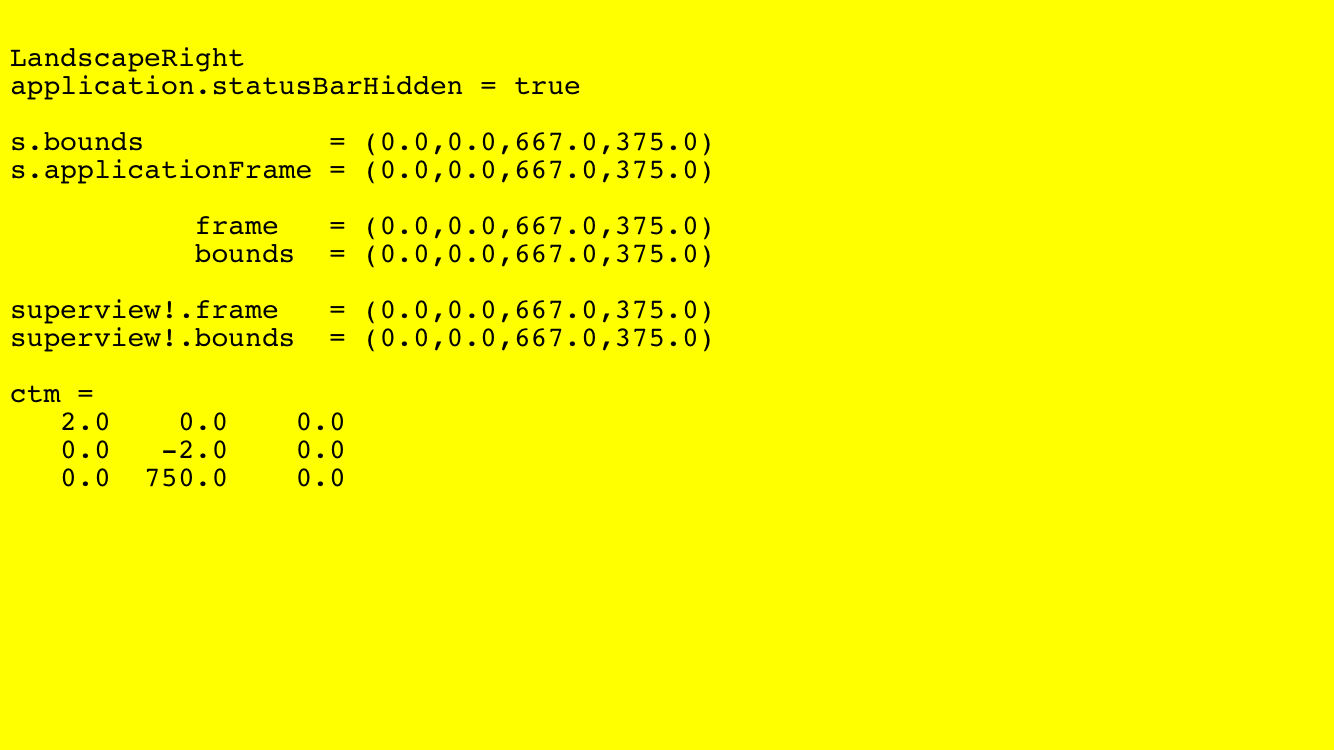
The
CTM
for
LandscapeLeft
and
LandscapeRight
means
“flip it upside down, double the coördinates,
and add 1136 to the
y.”
Things to try
-
Even though the view controller says that the view’s frame should only
be as big as the
applicationFrame,
the view occupies the entire window.
This causes the status bar to appear in front of the top part of the view.
To prevent the words in the view from apearing behind the status bar,
drawRect:
started the format string with the newline character
"\n".
A better way to accomplish this would be to remove the newline
and insert the following initialization code into the
initWithFrame:controller:
method of the view.
		//Draw no text in the part of the UITextView
		//that lies behind the status bar.
		CGFloat height = [UIApplication sharedApplication].statusBarFrame.size.height;

		self.textContainerInset = UIEdgeInsetsMake(
			height,
			self.textContainerInset.left,
			self.textContainerInset.bottom,
			self.textContainerInset.right
		);
- To make the controller redraw the view for all four possible
orientations,
the method
supportedInterfaceOrientations
should
	return UIInterfaceOrientationMaskPortrait
		| UIInterfaceOrientationMaskLandscapeLeft
		| UIInterfaceOrientationMaskLandscapeRight
		| UIInterfaceOrientationMaskPortraitUpsideDown;
or, more briefly,
return UIInterfaceOrientationMaskAll;
To make it redraw only for portrait and portrait upside down,
you can say
	return UIInterfaceOrientationMaskPortrait
		| UIInterfaceOrientationMaskPortraitUpsideDown;
See all the possible values for the
UIInterfaceOrientationMask.
- This app recognizes only four possible orientations.
For an app that recognizes two more, face up and face down,
see the
notification
center
example.
For an app that recognizes angles of tilt (e.g., 30°),
see
accelerometer.
- The
drawRect:
method of class
UIView
is called when the orientation of the view changes.
The
layoutSubviews
method of
class
UIView
is also called.
In class
View,
change the name of the
drawRect:
method to
layoutSubviews
and remove the unused parameter
rect.
- It might be easier to create this project with a different Xcode template.
Choose a template for your new project: Single View Application
(instead of Empty Application)
- Put some information into the
ViewController’s
tab bar item.
Add the file
star.png
to the Supporting Files folder in the Project Navigator,
checking the checkbox for
“Copy items into destination group’s folder (if needed).”
In
ViewController.m,
- (id) initWithNibName: (NSString *) nibNameOrNil bundle: (NSBundle *) nibBundleOrNil {
	self = [super initWithNibName: nibNameOrNil bundle: nibBundleOrNil];
	if (self) {
		// Custom initialization
		self.title = @"Title";
		self.tabBarItem.image = [UIImage imageNamed: @"star.png"];
		self.tabBarItem.badgeValue = @"b";
	}
	return self;
}
Run the app and note that the tab bar item is not yet visible.
Now put a tab bar controller over the the
ViewController.
Initialize the tab bar controller
in
application:didFinishLaunchingWithOptions:.
A tab bar controller usually has an array of five or so controllers under it,
but this tab bar controller has an array of only one controller.
Our other arrays were created with
arrayWithObjects:;
this tiny array is created with
arrayWithObject:.
	// Override point for customization after application launch.
	self.window.rootViewController = [[UITabBarController alloc] init];

	((UITabBarController *)self.window.rootViewController).viewControllers = [NSArray arrayWithObject:
		[[ViewController alloc] initWithNibName: nil bundle: nil]
	];
The
viewController’s tab bar item should now be visible.
(For a row of tab bar items, see the app store.)
A badge of more than one character
will block part of the star.

- Put some information into the
viewController’s
navigation item.
In the
initWithNibName:bundle:
method of class
ViewController,
insert the following code.
A naviagtion item has room for a more elaborate title than a tab bar item.
	self.navigationItem.prompt = @"Welcome to";
	self.navigationItem.title = @"More Elaborate Title";

	self.navigationItem.rightBarButtonItem = [[UIBarButtonItem alloc]
		initWithBarButtonSystemItem: UIBarButtonSystemItemDone
		target: nil
		action: NULL
	];
Run the app and note that the navigation item is not yet visible.
Now put a navigation controller over the
ViewController.
Initialize the navigation controller
in
application:didFinishLaunchingWithOptions:.
	self.window.rootViewController = [[UINavigationController alloc]
		initWithRootViewController: [[ViewController alloc]
			initWithNibName: nil
			bundle: nil
		]
	];
The
viewController’s
navigation item should now be visible.
We conclude that the navigation bar is 74 pixels (or pixel pairs) high,
because
20 + 74 + 386 = 420.
