A
binary file
is a file that is not a text file.
Examples include image files, sound files, and video files.
A binary file contains a
sequence
of bytes,
not a
string
of characters,
and therefore contains no lines to loop through.
Since the bytes do not represent characters,
the binary file must not be
decoded.
Inputting an entire file all at once is called
slurping
the file.
Line
26
demonstrates how to call
read
to slurp a binary file and store it as a
sequence
of bytes.
Line
27
demonstrates how to close the file.
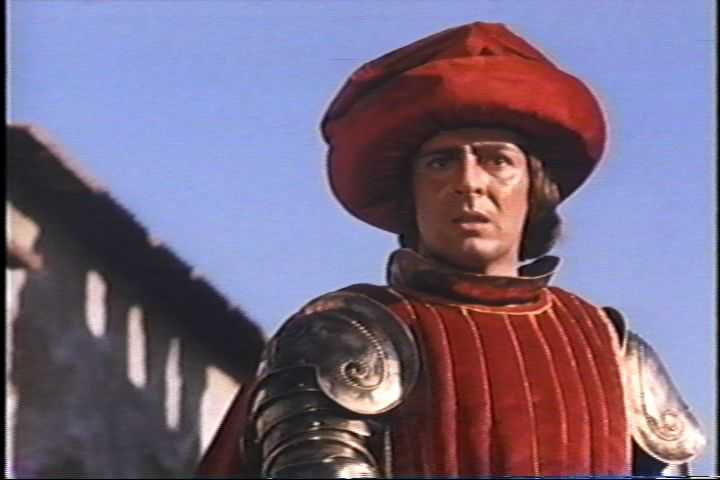
The most familiar example of a binary file is an image file.
Now that we have input the image file,
the simplest way to demonstrate that we have input it correctly
is to display it with a
tkinter
PhotoImage.
A
PhotoImage
can display gif or png,
so I’m using a gif file as our example of a binary file.
Download the binary file
escalus.gif
to your Desktop.
In the script,
change
myname
to your name.
The image is of type gif.
len(sequenceOfBytes) = 239,095
cd /Users/myname/Desktop
ls -l escalus.gif
-rw-r--r--@ 1 myname  mygroup  239095 Aug 24 17:52 escalus.gif
You could also download the binary file
escalus.png
to your Desktop.
In the script,
change the filename to
escalus.png.
root.geometry("720x480")to
width = photoImage.width()
height = photoImage.height()
root.geometry(f"{width}x{height}")
filename = "/Users/myname/Desktop/escalus.gif"to
import os
#macOS
filename = os.path.expanduser("~/Desktop/escalus.gif")

#Microsoft Windows
filename = os.path.expanduser(r"~\Desktop\escalus.gif")
#macOS
filename = "/Users/myname/Desktop/escalus.gif"
#Microsoft Windows
#filename = r"C:\Users\Myname\Desktop\escalus.gif"

try:
    binaryFile = open(filename, "rb")        #read binary
except FileNotFoundError as error:
    print(error, file = sys.stderr)
    sys.exit(1)
except PermissionError as error:
    print(error, file = sys.stderr)
    sys.exit(1)
to
url = "http://oit2.scps.nyu.edu/~meretzkm/python/string/escalus.gif" #or .png

try:
    binaryFile = urllib.request.urlopen(url)
except urllib.error.URLError as error:
    print(error, file = sys.stderr)
    sys.exit(1)
and
import urllib.request.
photoImage
to black and white before displaying it on the screen.
Insert the following code after creating the
photoImage,
width
and
height,
but before calling
create_image.
The three
ints
in the
tuple
are the amount of red, green, and blue
(in the range 0 to 255 inclusive)
in the pixel at row
y,
column
x.
for y in range(height):
    for x in range(width):
        t = photoImage.get(x, y)   #t is a tuple containing 3 ints.
        average = sum(t) // len(t)
        gray = f"#{average:02X}{average:02X}{average:02X}"   #a shade of gray
        photoImage.put(data = gray, to = (x, y))
Any color that has equal amounts of red, green, blue is a shade of gray. For example,
| sample | 3 ints | written in hex | name |
|---|---|---|---|
( 0, 0, 0) |
#000000 |
black | |
( 64, 64, 64) |
#404040 |
||
(128, 128, 128) |
#808080 |
gray | |
(192, 192, 192) |
#C0C0C0 |
silver | |
(255, 255, 255) |
#FFFFFF |
white |
photoImage.
Insert the following code after creating the
photoImage,
but before creating
width
and
height.
photoImage = photoImage.zoom(2, 2)
tkinter,
but jpg is not.
To display a jpg image image, install
Pillow.
The Pil stands for
Python
Imaging Library.
pip3 list
pip3 install pillow

pip3 list
Package         Version
--------------- --------
Pillow          6.1.0

pip3 show pillow
Name: Pillow
Version: 6.1.0
Summary: Python Imaging Library (Fork)
Home-page: http://python-pillow.org
Author: Alex Clark (Fork Author)
Author-email: aclark@aclark.net
License: UNKNOWN
Location: /Library/Frameworks/Python.framework/Versions/3.7/lib/python3.7/site-packages
Requires:
Required-by:
Here is the complete program.
This time I decided to display the
PhotoImage
in a
Canvas,
not a
Label.
"""
Download and display a jpg file.
"""

import sys
import tkinter
import urllib.request
import imghdr      #image header
import PIL.ImageTk #Python Imaging Library

url = "http://oit2.scps.nyu.edu/~meretzkm/python/string/escalus.jpg"

try:
    binaryFile = urllib.request.urlopen(url)
except urllib.error.URLError as error:
    print(error, file = sys.stderr)
    sys.exit(1)

sequenceOfBytes = binaryFile.read()
binaryFile.close()
print(f"The image is of type {imghdr.what(None, h = sequenceOfBytes)}.")
print(f"len(sequenceOfBytes) = {len(sequenceOfBytes):,}")

root = tkinter.Tk()

try:
    #The following statement cannot come before the tkinter.Tk().
    photoImage = PIL.ImageTk.PhotoImage(data = sequenceOfBytes)
except:
    print(f"Can't create PhotoImage: {sys.exc_info()[1]}")
    sys.exit(1)

width = photoImage.width()
height = photoImage.height()
root.geometry(f"{width}x{height}")
root.title("Prince Escalus")

#Put the center of the image at the center of the canvas.
canvas = tkinter.Canvas(root, highlightthickness = 0)
canvas.create_image(width / 2, height / 2, image = photoImage)
canvas.pack(expand = tkinter.YES, fill = "both")

root.mainloop()
The image is of type jpeg.
len(sequenceOfBytes) = 575,357
photoImage
from the jpg file
to black and white
before displaying it on the screen.
Insert the following code after creating the
photoImage,
width
and
height,
but before calling
create_image.
The three
ints
in the
tuple
are the amount of red, green, and blue
(in the range 0 to 255 inclusive)
in the pixel at row
y,
column
x.
for y in range(height):
    for x in range(width):
        t = photoImage._PhotoImage__photo.get(x, y) #t is a tuple containing 3 ints.
        average = sum(t) // len(t)
        gray = f"#{average:02X}{average:02X}{average:02X}"   #a shade of gray
        photoImage._PhotoImage__photo.put(data = gray, to = (x, y))
photoImage
form the jpg file.
Insert the following code after creating the
photoImage,
but before creating
width
and
height.
photoImage = photoImage._PhotoImage__photo.zoom(2, 2)