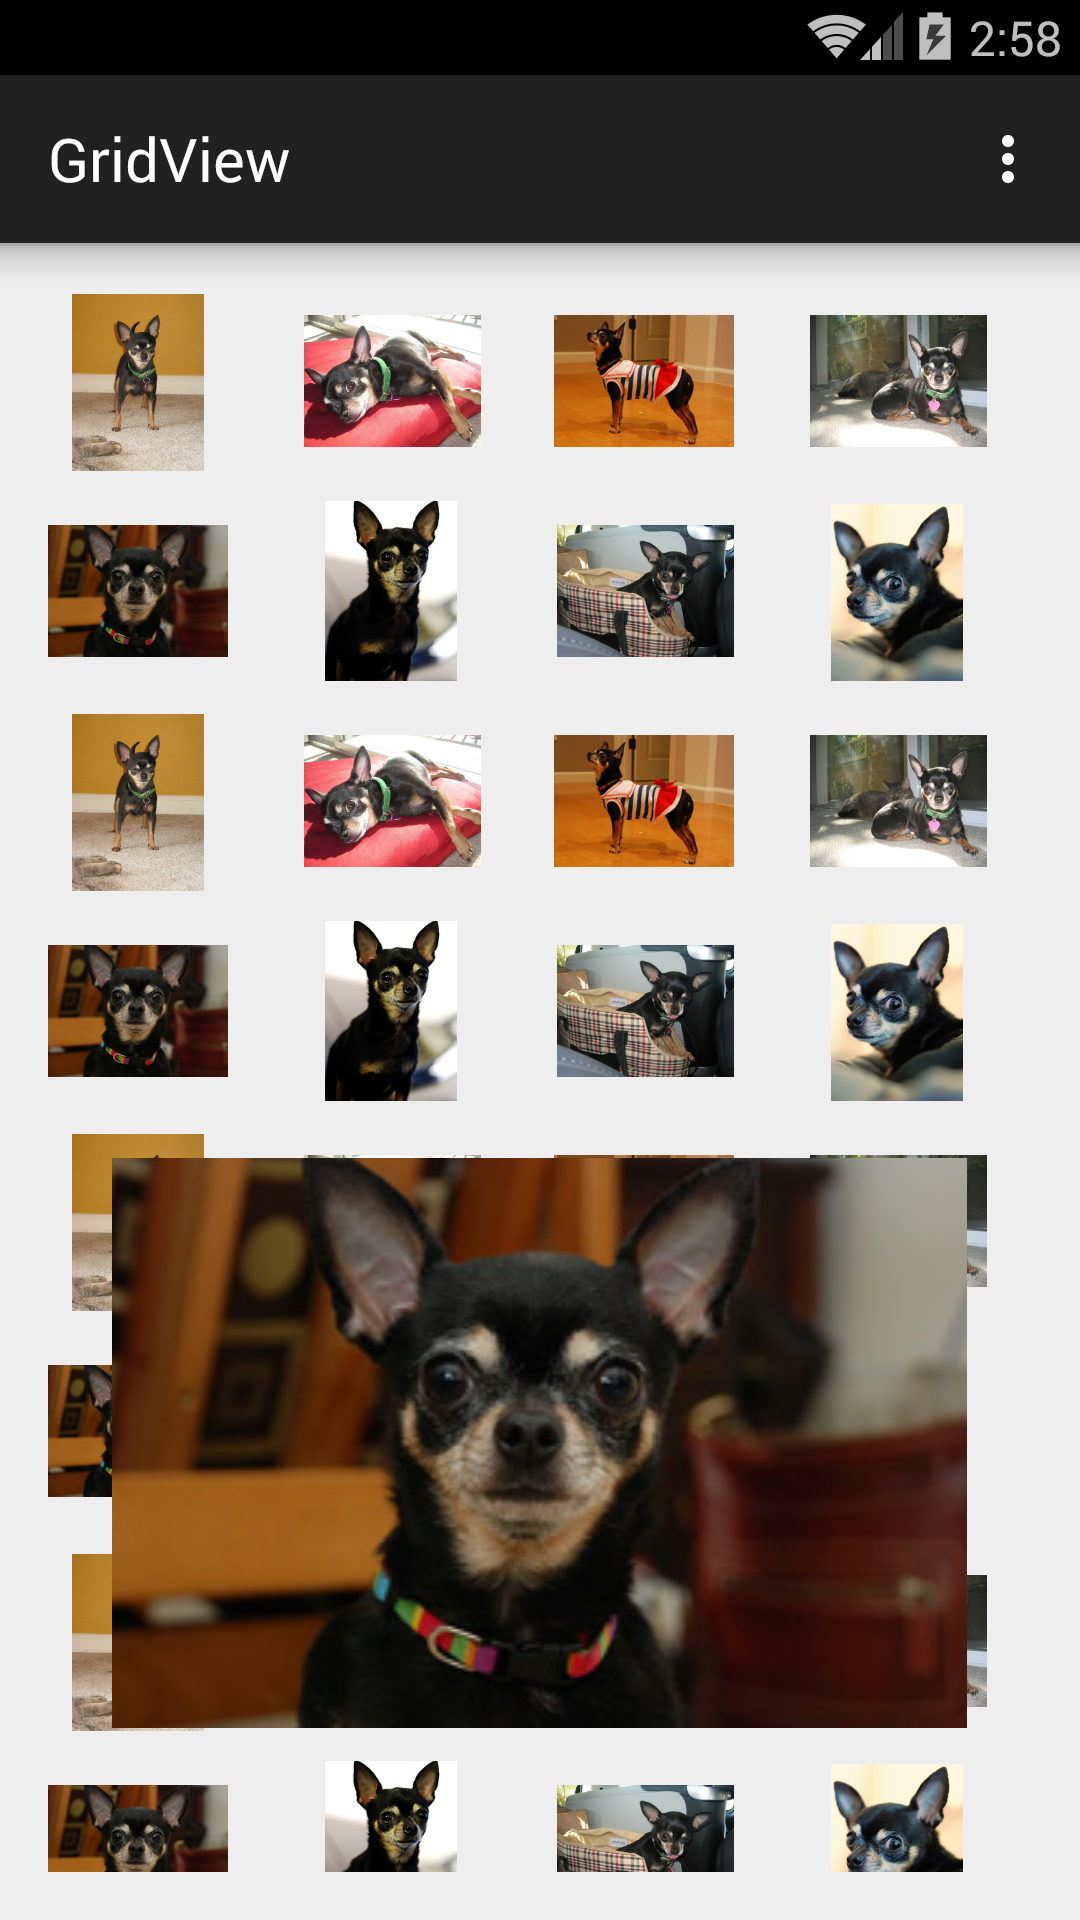
Tap on a photo to bring up a piece of
Toast
containing a bigger version of the photo.
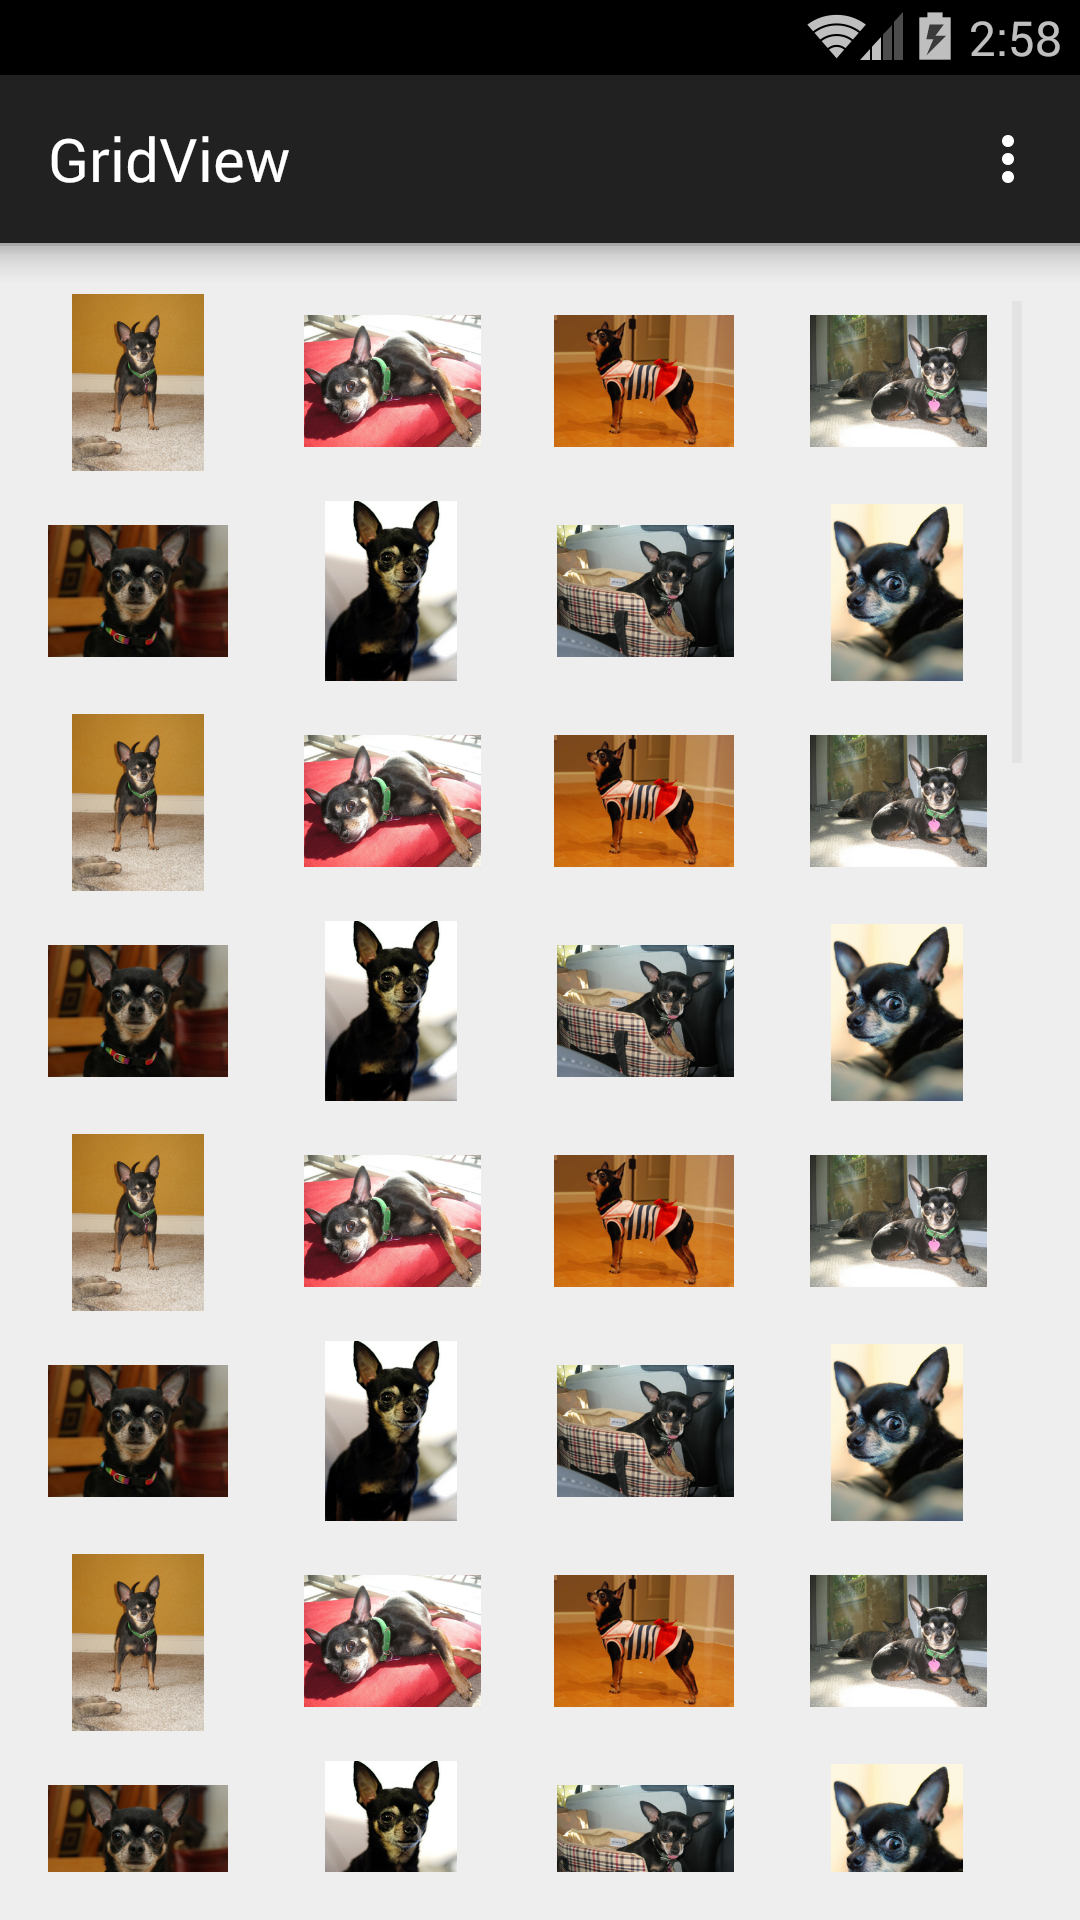
The photos in the
GridView,
and the
spacing
between them,
are the same size (measured in inches)
on each device.
The first two screenshots are on a Samsung Galaxy 5S in portrait orientation.
Its dimensions are 1080 × 1920 pixels at 480 pixels per inch,
so the screen width is 1080/480 inches
= 2¼ inches
= 160 * 2¼
dp
= 360
dp.
But the
GridView
is contained in a
RelativeLayout
that has a total of 32
dp
of padding on its left and right
(see
values/dimens.xml),
leaving us with only
360 − 32 = 328
dp.
Each column is 60
dp
wide,
and the spacing bewteen the columns is 10
dp
wide,
so we have room for four (but not five) columns:
60 + 10 + 60 + 10 + 60 + 10 + 60 = 270 ≤ 328.
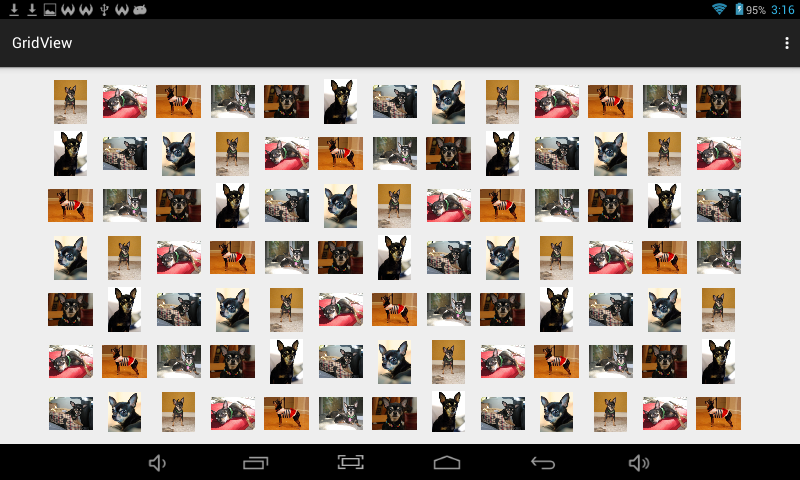
The third screenshot is on an Azpen A727 tablet in landscape orientation.
Its dimensions are 800 × 480 pixels at 120 pixels per inch,
so the screen width is 800/120 inches
= 6⅔ inches
= 160 * 6⅔
dp
= 1066⅔
dp.
But the
GridView
is contained in a
RelativeLayout
that has a total of 128
dp
of padding on its left and right
(see
values-w820dp/dimens.xml),
leaving us with only
1066⅔ − 128 = 938⅔
dp.
Each column is 60
dp
wide,
and the spacing bewteen the columns is 10
dp
wide,
so we have room for 13 (but not 14) columns:
60 + 10 +
60 + 10 +
60 + 10 +
60 + 10 +
60 + 10 +
60 + 10 +
60 + 10 +
60 + 10 +
60 + 10 +
60 + 10 +
60 + 10 +
60 + 10 +
60
= 900 ≤ 938⅔
In
Spinner
and
ListView,
our
Adapter
was an off-the-shelf
ArrayAdapter.
An
ArrayAdapter
converts each data item to a
String
(with the Java method
toString)
and puts the result in a
TextView.
But the data items in this app are images,
so we will have to use a different class of
Adapter.
In fact, we will have to write our own class of
Adapter.
ImageAdapter.
The most important methods of the adapter are
getCount,
which returns a number,
and
getView,
which returns a
View.
In this app, the
View
is an
ImageView.
Class
ImageView
is a subclass of
View
specialized for displaying an image,
just as a
TextView
is specialized for displaying text.
The
getView
method receives a
position
argument in the range 0 to 99 inclusive.
How can it create 100
ImageViews
when we have only eight photos?
We put
sample_0.jpg
into
ImageView
number 0, 8, 16, 24, 32, etc.
We put
sample_1.jpg
into
ImageView
number 1, 9, 17, 25, 33, etc.
We put
sample_2.jpg
into
ImageView
number 2, 10, 18, 26, 34, etc.
Et cetera.
getCount
and
getView
are called by the
AdapterView.
In this app, the
AdapterView
is a
GridView.
See
Grid
View.
One method that is not called is
getItem,
but I wrote it anyway just for completeness.
getItem
calls the recently deprecated one-argument
getDrawable
rather than the newfangled two-argument
getDrawable,
because I want my app to be able to run on older Android devices.
See the
minSdkVersion
in
build.gradle.
In addition to plugging an
Adapter
into the
GridView,
we also plug an
AdapterView.OnItemClickListener
into the
GridView
to make something happen when an image is clicked.
As usual, the “something”
will be to pop up a
Toast.
Until now, our
Toasts
have contained only text.
This time,
the
Toast
will contain an
ImageView.
MainActivity.java
ImageAdapter.java
R.java
creates the
int
variables
R.drawable.sample_0,
R.drawable.sample_1,
etc.
activity_main.xml.
The
RelativeLayout
that occupies the whole screen
has been replaced by a
GridView
that usually occupies the whole screen.
dp
are
density-independent
pixels,
160 per inch.
values/dimens.xml
values-w820dp/dimens.xml.
In landcape oriention,
the screen width of my Azpen A727 tablet is 800 pixels =
800/120 inches = 6⅔ inches = 160 * 6⅔
dp
= 1066⅔
dp.
AndroidManifest.xml
build.gradle
(Module: app)
sample_0.jpg
(213 × 285)sample_1.jpg
(285 × 213)sample_2.jpg
(285 × 191)sample_3.jpg
(285 × 213)sample_4.jpg
(285 × 190)sample_5.jpg
(191 × 285)sample_6.jpg
(285 × 213)sample_7.jpg
(213 × 285)sample_thumb_0.jpg
(45 × 60).
These thumbnails are not used.
After I added them to the project,
I discovered they were too small for the contemporary number of dpi.
sample_thumb_1.jpg
(60 × 45)
sample_thumb_2.jpg
(60 × 40)
sample_thumb_3.jpg
(60 × 45)
sample_thumb_4.jpg
(60 × 40)
sample_thumb_5.jpg
(40 × 60)
sample_thumb_6.jpg
(60 × 45)
sample_thumb_7.jpg
(45 × 60)
In the Android Studio
project
view,
select the folder
app/java/edu.nyu.scps.gridview.
File →
New… →
Java Class
Create New Class
Name: ImageAdapter
Kind: Class
OK
In the new file
ImageAdapter.java,
click on the word
ImageAdapter
and pull down
Code → Implement Methods…
Select the four methods that need to be implemented and press OK.
In the Macintosh Finder,
control-click on each
.jpg
file and select Copy.
In the Android Studio
project
view, highlight
the folder
app/res/drawable,
control-click on it,
and select Paste.
A
GridView
keeps its
Views
in the order that you determine,
but it does not necessarily keep a
View
in the same row and column.
For example,
the number of columns can change when you switch devices
(see the above screenshots)
or when you change the orientation of a device.
Use a
TableLayout
when you want to keep each
View
in the same row and column.
Use a
GridView
when you don’t care about keeping a
View
in the same row and column.
Every row in a
GridView
contains the same number of
Views,
except possibly the last.
But each row of a
TableLayout
can have a different number of
Views.
TableLayout
in
ApiDemos:
Views → Layouts → TableLayout
GridView
of all the icons of all the apps on the Android device.
See
action.MAIN
and
category.LAUNCHER
in the
AndroidManifest.xml
file.
ApiDemos/src/com/example/android/apis/view/Grid1.java
BaseAdapter
named
Grid1.AppsAdapter
that puts each icon into an
ImageView.
ApiDemos/res/layout/grid_1.xml
GridView.
GridView
of small photos of dogs.
ApiDemos/src/com/example/android/apis/view/Grid2.java
BaseAdapter
named
Grid2.ImageAdapter
that puts each photo into an
ImageView.
The photos come from resources.
ApiDemos/res/layout/grid_2.xml
GridView.
ApiDemos/res/drawable/sample_thumb_0.jpg
(45 × 60)
ApiDemos/res/drawable/sample_thumb_1.jpg
(60 × 45)
ApiDemos/res/drawable/sample_thumb_2.jpg
(60 × 40)
ApiDemos/res/drawable/sample_thumb_3.jpg
(60 × 45)
ApiDemos/res/drawable/sample_thumb_4.jpg
(60 × 40)
ApiDemos/res/drawable/sample_thumb_5.jpg
(40 × 60)
ApiDemos/res/drawable/sample_thumb_6.jpg
(60 × 45)
ApiDemos/res/drawable/sample_thumb_7.jpg
(45 × 60)
GridView
of all the icons of all the apps on the Android device.
Hold down an icon for a second to select it;
the tap other icons to select them.
ApiDemos/src/com/example/android/apis/view/Grid3.java
BaseAdapter
named
Grid1.AppsAdapter
that puts each icon into an
ImageView.
Also plugs a
AbsListView.MultiChoiceModeListener
into the
GridView.
ApiDemos/res/layout/grid_1.xml
GridView.
ApiDemos/res/values/colors.xml
blue.
ImageView
in the
Toast.
The
ImageView
and
TextView
are contained in the simplest type of
layout,
a
FrameLayout.
After creating the
ImageView,
insert the following code.
                TextView textView = new TextView(MainActivity.this);
                textView.setBackgroundColor(Color.TRANSPARENT);
                textView.setTextColor(Color.GREEN);
                textView.setText(" position = " + position + ", id = " + id);

                FrameLayout frameLayout = new FrameLayout(MainActivity.this);
                frameLayout.addView(imageView);
                frameLayout.addView(textView);

                //Insert the FrameLayoutToast.
                Toast toast = new Toast(MainActivity.this);
                toast.setView(frameLayout);
                toast.show();