Your device’s Settings app
will tell you the version of Android that runs on your device.
Settings →
SYSTEM →
About phone (or tablet) →
Android version
The
build.gradle
(app)
file in
Gradle Scripts
will show you the
minimum
SDK version
demanded by your app
(default, API 15).
This information used to be in the
AndroidManifest.xml
file.
To lower this number to accommodate an older phone or tablet,
see exercise 12 in
Hello.
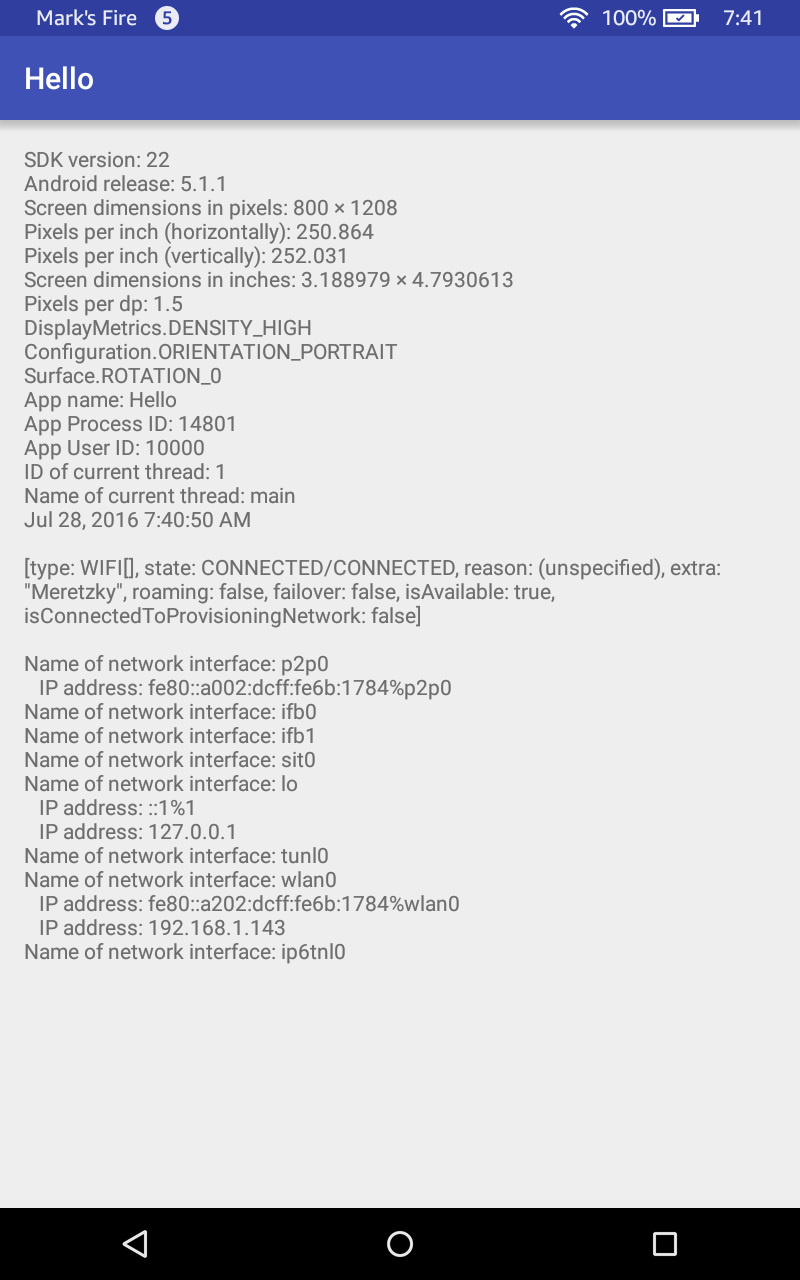
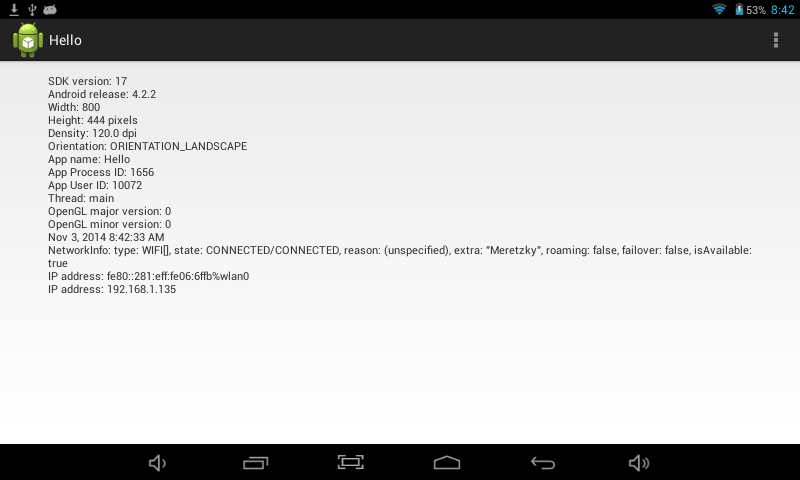
My Amazon Fire HD 6 runs
Android 5.1
(under Device → Device Options → System Updates; API 22),
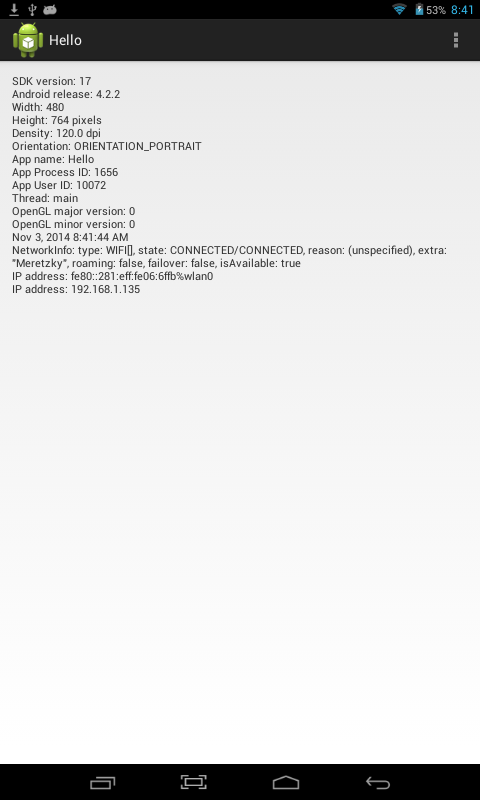
my
Azpen
tablet runs
Android 4.2.2
(API 17),
but my Motorola phone runs a lowly
Android 2.3.5
(API 10).
Even though my phone is 2.3.5,
I was still able to compile the app with
the current Android 5.0.
To find out which Android you’re using,
File → Project Structure…
In the left panel, select
app
and
click the Properties tab.
If you want, you can change the build target to an older version of Android.
First,
see what versions of Android are installed in your Android Studio.
Tools → Android →
Android
SDK Manager
Use the SDK Manager to install an older version of Android.
Then change the project’s
minimum SDK version.
Before you plug in the device,
make sure your app runs successfully in the Android
emulator.
Then keep Eclipse running as you plug the USB cable into a port
on the computer that runs Eclipse.
In the Settings app on the device,
go to
personal →
Security →
device administration →
and enable Unknown sources.
Then in the Settings app go to
system →
About phone →
and tap on the Build number seven times.
(For the mystical number seven, see
Enabling
adb Debugging.)
You are now 6 steps away from being a developer.
You are now 5 steps away from being a developer.
You are now 4 steps away from being a developer.…
Go back to
system
and observe that there is now a
“{ } Developer options”
item.
Tap it and enable USB debugging.
On my Amazon Fire HD 6 (4th Generation), the selections were slightly different.
In the Settings app, go to
Personal → Security
and turn on Apps from Unknown Sources.
Then in the Settings app,
go to
Device → Device Options
and tap Serial Number seven times.
You are now 6 steps away from being a developer.…
Observe that there is now a Developer Options heading under Device Options.
In the Settings app, go to
Device → Device Options → Developer Options → Debugging
and turn on Enable ADB.
Allow USB debugging?
The computer’s RSA fingerprint is (16 bytes in hex)
OK
On Mac, launch /Applications/Utilities/System Information.
Select
Hardware → USB
Pull down
File → Refresh Information
and look for your Android device.
Open Terminal window (on Mac)
or a Command Prompt window (on Microsoft Windows).
You should be able to run a command line tool named
adb.
This program is in the
~/Library/Android/sdk/platform-tools
directory,
and we put the name of this directory into your
PATH
environment variable when we
installed
the SDK.
adb
will display a list of the devices that it knows about,
including the emulator.
(It may take a minute for the emulator to come online.)
adb help

adb devices
List of devices attached
emulator-5554		device
ca1784a34445a8d0308	device
0088080744830RTG	device

adb devices -l
You should now also be able to see your device in the dropdown menu above the logcat tab at the bottom of Android Studio. If your device is not listed, unplug it and plug it back in. You could also try
adb kill-server
adb start-server
adb devices
If you’re running Android Studio on Microsoft Windows,
you have to install a device driver onto your PC
in order to copy your app from your PC to your Android device.
In Android Studio,
Tools → Android →
Android
SDK Manager.
Under Extras, check Google USB Driver.
Press the Install button,
accept the license,
and press another Install button.
This will create the file
adt-bundle-<os_platform>-yyyymmdd\sdk\extras\google\usb_driver\android_winusb.inf.
For my Motorola MB612 Sprint phone,
I didn’t have to make any change to this
android_winusb.inf
file.
For my el-cheapo
Azpen
A727 tablet
($14.97, plus $1.49 for a two-year warranty,
plus $1.38 tax at the Micro Center in Yonkers, New York),
I had to use WordPad to add the following lines just before the
[USB_Install]
section in
android_winusb.inf.
(I got the vendor ID number from the Windows Device Manager
by right-clicking and selecting
Properties →
Details →
Hardware Ids.)
;Azpen A727
%SingleAdbInterface%        = USB_Install, USB\VID_1F3A&PID_0002
%CompositeAdbInterface%     = USB_Install, USB\VID_1F3A&PID_0002&MI_01
For my Motorola phone,
I did not need to create and edit the file
adb_usb.ini
in the
.android
subdirectory of my home directory on my PC.
For my Azpen tablet,
I did have to create and this file
when running
Eclipse on a PC or on a Mac.)
I ran the following command to create
adb_usb.ini.
android update adb
Then I appended the following two lines to
adb_usb.ini
using TextEdit on Mac, WordPad on PC.
#Vendor ID number of Azpen www.azpenpc.com
0x1F3A
Then I went to the Microsoft Windows start button.
start →
right click on Computer →
Properties →
Device Manager
I plugged my Motorola phone into the computer via a USB cable
and suddenly the Device Manager
showed a new device named
“Motorola ADB Interface”
under Other devices.
(A “MTP USB Device” also appeared under Portable Devices.
If nothing new appears,
right-click on the first line of the list of devices and select
Scan for hardware changes.)
I right-clicked on the Motorola ADB Interface and selected
Update Driver Software…
Browse my computer for driver software
Let me pick from a list of device drivers on my computer
Select your device’s type from the list below.
Click on Show All Devices.
Press Next.
Press Have Disk…
Install from Disk
Press Browse…
Browse to the directory
C:\Users\myname\Development\adt-bindle-windows-x86_64-20140702\sdk\extras\google\usb_driver
When you get back to the “Install From Disk” window
(with the Browse… button), press OK.
Select the device driver you want to install for this hardware.
Select Android ADB Interface and press Next.
Update Driver Warning: Do you want to continue installing this device?
Yes
Install
Installing driver software…
Windows has successfully updated your driver software.
Windows has finished installing the driver software for this device:
Android ADB Interface
Close
adb kill-server
adb start-server
adb devices
List of devices attached
emulator-5554      device
0A3A9CFF15025025   device
Run the project again.
Select Deployment Target
Connected Devices:
Available Emulators:
This time, choose your phone or tablet and press OK.
(If you do not see the Select Deployment Target window,
pull down
Run → Stop 'app'
and then run the project again.)
Click the green Run triangle at the lower edge of Android Studio and you’ll see your device.
08/02 18:17:05: Launching app
$ adb push /Users/myname/AndroidStudioProjects/Touch/app/build/outputs/apk/app-debug.apk /data/local/tmp/edu.nyu.sps.touch
$ adb shell pm install -r "/data/local/tmp/edu.nyu.sps.touch"
	pkg: /data/local/tmp/edu.nyu.sps.touch
Success


$ adb shell am start -n "edu.nyu.sps.touch/edu.nyu.sps.touch.MainActivity" -a android.intent.action.MAIN -c android.intent.category.LAUNCHER
Connected to process 22912 on device amazon-kfarwi-0088080744830RTG
To force the app to stop running or to uninstall it from the device,
Settings →
Applications →
Manage applications
Select your application.
Force Stop/Uninstall
In the lower left corner of Android Studio, click on the logcat tab. Select your device (phone or tablet) from the dropdown menu above the tab. Click on the camera icon along the left margin. It has a circular blue lens. (If you don’s see the camera icon, press 6: Android Monitor along the lower edge of Android Studio.) Press the Save button to the lower right of the resulting image.
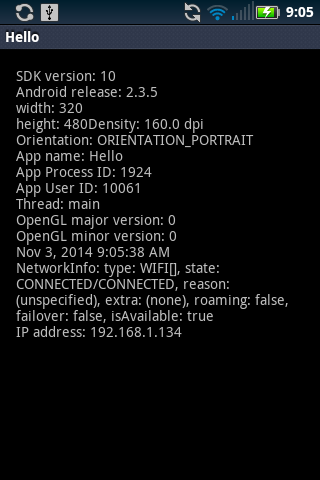
My Motorola MB612 runs Android 2.3.5, API 10.
To get the app to run on this phone, I had to change the
minSdkVersion
of the app from 15 to 10.
See exercise 1 of
Hello.
I also had to substitute the older code in exercise 2 of
Text
to avoid the following message in the LogCat window.
(I forgot to patch in the
"\n"
after the height.)
11-03 08:58:45.694    1784-1784/edu.nyu.sps.hello E/AndroidRuntime: FATAL EXCEPTION: main
    java.lang.NoSuchMethodError: android.view.Display.getSize
            at edu.nyu.sps.hello.MainActivity.onCreate(MainActivity.java:46)