 Source code in Japan.zip
We printed a line of text in the
drawRect:
 Source code in Japan.zip
main.mJapanAppDelegateViewIcon60x60@2x.png
(120 × 120 pixels)Default-568h@2x.png:
launch image
(640 × 1136 pixels).
This launch image has the top 40 pixels clear for the status bar,
the bottom 1096 pixels white.
In real life, the bottom 1096 pixels would simply be the flag of Japan.
The
main
function calls the
UIApplicationMain
function,
which creates the
JapanAppDelegate
object.
The
application:didFinishLaunchingWithOptions:JapanAppDelegate
object creates a
View
object.
Someone calls the
drawRect:View
object.
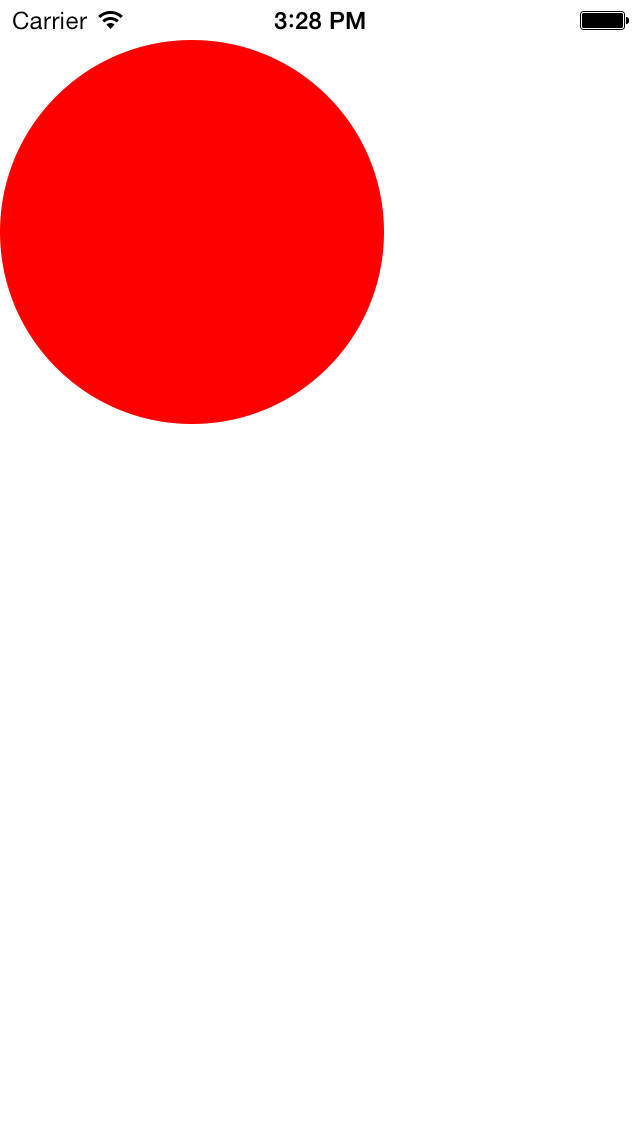
A Quartz path is a list of figures to be drawn: circles, squares, lines, etc. Our first path will consist of one circle. A path has no color. The color is specified later, just before the path is filled (painted) into the view.
The function
CGContextBeginPath
empties out the path so we have a clean start.
But this call does nothing here,
because the path given to
drawRect:
Our
drawRect:r.
Then
CGContextAddEllipseInRect
creates an ellipse that fits into the specified
rectangle.
Since our
rectangle
is a perfect square,
our ellipse will be a perfect circle.
drawRect:CGContextFillPath
again, nothing would be drawn.
The
destination
to which we draw (in this case, the
View
object)
is represented by a
CGContextRef.
We get this destination by calling the function
UIGraphicsGetCurrentContext.
UIGraphicsGetCurrentContext
cannot be called in the
initWithFrame:
method—that
would be too early.
CGContextSetRGBFillColor
sets the color that will fill the circle.
CGContextFillPath
fills the whole circle with this color,
not just the outline.
CGContextFillPath
also empties out the path.
Insert the following code at the start of the
drawRect:
method of class
View.
	NSLog(@"self.frame == (%g, %g), %g × %g",
		self.frame.origin.x,
		self.frame.origin.y,
		self.frame.size.width,
		self.frame.size.height
	);

	NSLog(@"self.bounds == (%g, %g), %g × %g",
		self.bounds.origin.x,
		self.bounds.origin.y,
		self.bounds.size.width,
		self.bounds.size.height
	);
The retina unit of measurement is a pair of pixels. The frame and bounds rectangles are therefore 640 × 1096 pixels.
2013-10-23 16:28:52.154 Japan[4071:a0b] self.frame == (0, 20), 320 × 548
2013-10-23 16:28:52.155 Japan[4071:a0b] self.bounds == (0, 0), 320 × 548
iPad retina in portrait orientation:
2013-10-23 16:36:41.979 Junk[4338:a0b] self.frame == (0, 20), 768 × 1004
2013-10-23 16:36:41.988 Junk[4338:a0b] self.bounds == (0, 0), 768 × 1004
The
superview
of a
view
is the bigger view that encloses the view.
For example,
the superview of our
View
is the
window.
The
frame
property of a
view
is a
rectangle.
The
frame.size
gives the size of the view.
The
frame.origin
gives the position of the view’s upper left corner
in the view’s superview.
For example,
the upper left corner of our
View
has the coördinates
The
bounds
property of a
view
is also a
rectangle.
The
bounds.size
gives the
size of the view.
The
frame.size
and the
bounds.size
are therefore the same
(until we get into obscure issues of rotation and portrait/landscape).
The
bounds.origin
of a
view
gives the coördinates of the view’s upper left corner
in the view’s own coördinate system.
For example, the upper left corner of our
View
has the coördinates
View.
To sum up: the upper left corner of the
View
is in the fortieth row of pixels of the window,
but is in the zeroeth row of pixels of the
View.
The upper left corner of the circle was at the
upper left corner of the
view.
But we want to center the circle in the
View.
There are three ways to do this.
drawRect:
method of class
View,
change the rectangle from
	CGRect r = CGRectMake(
		bounds.origin.x,
		bounds.origin.y,
		2 * radius,
		2 * radius
	);
to
	CGRect r = CGRectMake(
		bounds.origin.x + bounds.size.width / 2 - radius,
		bounds.origin.y + bounds.size.height / 2 - radius,
		2 * radius,
		2 * radius
	);
This will move the circle to the right and down.
drawRect:
method of class
View.
	UIFont *font = [UIFont systemFontOfSize: 32];

	NSDictionary *attributes =
		[NSDictionary dictionaryWithObject: font forKey: NSFontAttributeName];

	[@"Origin" drawAtPoint: CGPointZero withAttributes: attributes];
The following diagram shows the origin in the upper left corner of the
View
on an iPhone 5 in portrait orientation.
View.
initWithFrame:
method of the
View
immediately after setting the
background
color to
white.
The new statements can not be inserted into the
drawRect:
method—that would be too late.
		//Keep the width and height of the view the same,
		//but let the center of the view be the origin.

		CGFloat w = self.bounds.size.width;
		CGFloat h = self.bounds.size.height;
		self.bounds = CGRectMake(-w / 2, -h / 2, w, h);
We can now simplify the rectangle in
drawRect:
to
	CGRect r = CGRectMake(
		-radius,
		-radius,
		2 * radius,
		2 * radius
	);
initWithFrame:,
but let the rectangle remain as
	CGRect r = CGRectMake(
		-radius,
		-radius,
		2 * radius,
		2 * radius
	);
Insert the following transformation into
drawRect:.
Since it uses the variable
c,
it must be inserted after you create
c.
To have an effect on the circle,
it must be inserted before the call to
CGContextAddEllipseInRect.
CGContextTranslateCTM(c, bounds.size.width / 2, bounds.size.height / 2);The following is a roundabout way to do exactly the same translation. Instead of putting the horizontal and vertical distances directly into the CTM, we can put them into the variable
translate.
Then at some later time, we can put
translate
into the CTM.
	CGAffineTransform translate = CGAffineTransformMakeTranslation(
		bounds.size.width / 2,
		bounds.size.height / 2
	);

	CGContextConcatCTM(c, translate);
CGAffineTransform
is a tug, squish, or twist that can be applied to
what we draw in a
UIView.
We have just seen one example:
translating (moving) the drawing to the lower right.
The CTM is the cumulative series of all the
CGAffineTransforms
applied to the drawing.
CTM stands for
current
transformation matrix
and is represented as a
CGFloats,
which you can print
in
drawRect:
as follows.
ctm
is a structure with six fields holding the first two columns of the matrix;
the third colum is always 0, 0, 1.
The
format
%6g
prints each number in a space at least six characters wide.
For example, a single-digit whole number
will print with five blanks in front of it.
	CGContextRef c = UIGraphicsGetCurrentContext();
	CGAffineTransform ctm = CGContextGetCTM(c);
	NSLog(@"%6g%6g%6g", ctm.a,  ctm.b,  0.0);
	NSLog(@"%6g%6g%6g", ctm.c,  ctm.d,  0.0);
	NSLog(@"%6g%6g%6g", ctm.tx, ctm.ty, 1.0);	//translate x, translate y
The original CTM,
before we put the
translation
into it,
was the following on an iPhone 5 with a 640 × 1136 pixel screen
and a 40-pixel status bar.
1096 = 1136 − 40.
2013-10-23 16:56:04.669 Japan[4451:a0b]      2     0     0
2013-10-23 16:56:04.671 Japan[4451:a0b]      0    -2     0
2013-10-23 16:56:04.672 Japan[4451:a0b]      0  1096     1
Here’s what the numbers mean.
The iPhone screen is upside down from the Mac point of view.
The Mac origin is the lower left corner of the Mac screen
and the Mac Y axis points up.
The iPhone origin is the upper left corner of the iPhone screen
and the iPhone Y axis points down.
The point whose iPhone coördinates are
2013-10-11 13:34:46.062 Japan[85712:c07]      2     0     0
2013-10-11 13:34:46.062 Japan[85712:c07]      0    -2     0
2013-10-11 13:34:46.063 Japan[85712:c07]      0   920     1
The formula for computing the y coördinate of a point on a Mac, given the y coördinate of the same point on an iPhone 4, is –2y + 920
The portrait retina iPad CTM is
2013-10-11 13:36:35.104 Japan[87346:c07]      1     0     0
2013-10-11 13:36:35.104 Japan[87346:c07]      0    -1     0
2013-10-11 13:36:35.104 Japan[87346:c07]      0  1004     1
A
Exercise.
In ¶ 2 above,
we temporarily assigned a new value to
self.bounds
in
initWithFrame:.
What effect did this have on the CTM in
drawRect:?
What are the values of the
tx
and
ty
fields of the CTM?
Insert the following statement immediately after the call to
CGContextTranslateCTM.
It will double the size of everything you draw.
CGContextScaleCTM(c, 2, 2); //horizontal scale, vertical scaleThe following is a roundabout way to do exactly the same scaling. Instead of putting the horizontal and vertical scale factors directly into the CTM, we can put them into the variable
scale.
Then at some later time, we can put
scale
into the CTM.
	CGAffineTransform scale = CGAffineTransformMakeScale(2, 2);
	CGContextConcatCTM(c, scale);
What happens if the horizontal or vertical scale are 1? What happens if the horizontal or vertical scale are .5? What happens if the horizontal or vertical scale are zero? What happens if the horizontal or vertical scale is –1? What happens if the horizontal and vertical scales are different numbers? What would happen if you performed the scaling before the
CGContextTranslateCTM?
The combination I use the most frequently in
drawRect:
is to put the origin in the center of the
UIView,
with the Y axis pointing up:
	//Put the origin at the center of the UIView.
	CGContextTranslateCTM(c, self.bounds.size.width / 2, self.bounds.size.height / 2);

	//Make the Y axis point up.
	CGContextScaleCTM(c, 1, -1);
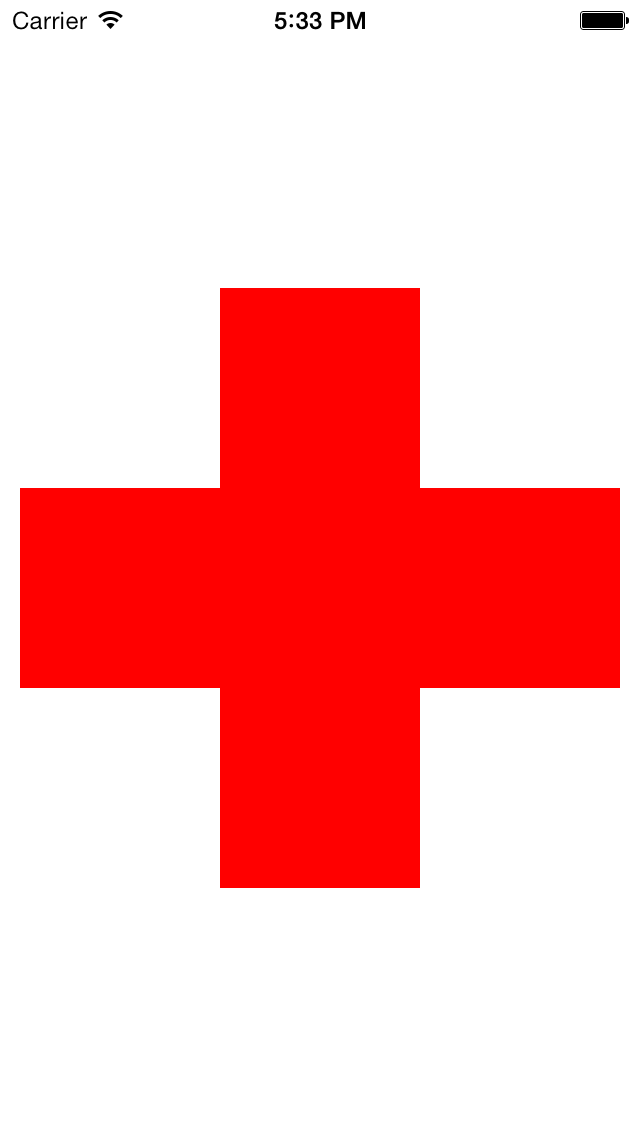
Have the
drawRect:
method of class
View
draw a cross made of two rectangles.
Each rectangle has a long side and a short side.
Since the y scale is
- (void) drawRect: (CGRect) rect {
	// Drawing code
	//Fill the Red Cross.
	CGSize size = self.bounds.size;
	CGFloat min = MIN(size.width, size.height);
	CGFloat longSide = min * 15 / 16;
	CGFloat shortSide = longSide / 3;

	CGContextRef c = UIGraphicsGetCurrentContext();
	CGContextBeginPath(c);

	CGContextTranslateCTM(c, size.width / 2, size.height / 2); //origin at center of view
	CGContextScaleCTM(c, 1, -1);                               //make Y axis point up

	CGRect horizontal = CGRectMake(-longSide / 2, -shortSide / 2, longSide, shortSide);
	CGRect   vertical = CGRectMake(-shortSide / 2, -longSide / 2, shortSide, longSide);
	CGContextAddRect(c, horizontal);
	CGContextAddRect(c, vertical);

	CGContextSetRGBFillColor(c, 1.0, 0.0, 0.0, 1.0);
	CGContextFillPath(c);
}
Instead of making the cross out of two rectangles,
we can make it out of one rectangle drawn twice.
The iPhone origin is at the upper left corner of the screen.
The Mac origin is at the lower left corner of its screen.
From the Mac point of view, the iPhone is upside down.
That’s why a counterclockwise angle is positive on a Mac,
negative on an iPhone.
But since our negative scale has made the Y axis point upwards,
a counterclockwise angle is now positive on an iPhone.
Multiply by
- (void) drawRect: (CGRect) rect {
	// Drawing code
	//Fill the Red Cross.
	CGSize size = self.bounds.size;
	CGFloat min = MIN(size.width, size.height);
	CGFloat longSide = min * 15 / 16;
	CGFloat shortSide = longSide / 3;

	CGContextRef c = UIGraphicsGetCurrentContext();
	CGContextBeginPath(c);

	CGContextTranslateCTM(c, size.width / 2, size.height / 2); //origin at center of view
	CGContextScaleCTM(c, 1, -1);                               //make Y axis point up

	CGRect horizontal = CGRectMake(-longSide / 2, -shortSide / 2, longSide, shortSide);
	CGContextAddRect(c, horizontal);
	CGContextRotateCTM(c, 90 * M_PI / 180);	//90 degrees counterclockwise
	CGContextAddRect(c, horizontal);

	CGContextSetRGBFillColor(c, 1.0, 0.0, 0.0, 1.0);
	CGContextFillPath(c);
}
Each color requires its own
CGContextFillPath.
- (void) drawRect: (CGRect) rect {
	// Drawing code
	//Fill the Red Cross.
	CGSize size = self.bounds.size;
	CGFloat min = MIN(size.width, size.height);
	CGFloat longSide = min * 15 / 16;
	CGFloat shortSide = longSide / 3;

	CGContextRef c = UIGraphicsGetCurrentContext();
	CGContextBeginPath(c);

	CGContextTranslateCTM(c, size.width / 2, size.height / 2); //origin at center of view
	CGContextScaleCTM(c, 1, -1);                               //make Y axis point up

	CGRect horizontal = CGRectMake(-longSide / 2, -shortSide / 2, longSide, shortSide);
	CGContextAddRect(c, horizontal);

	CGContextSetRGBFillColor(c, 1.0, 0.0, 0.0, 0.5);
	CGContextFillPath(c);

	CGContextBeginPath(c);
	CGContextRotateCTM(c, M_PI / 2);	//90 degrees clockwise
	CGContextAddRect(c, horizontal);

	CGContextSetRGBFillColor(c, 0.0, 0.0, 1.0, 0.5);
	CGContextFillPath(c);
}
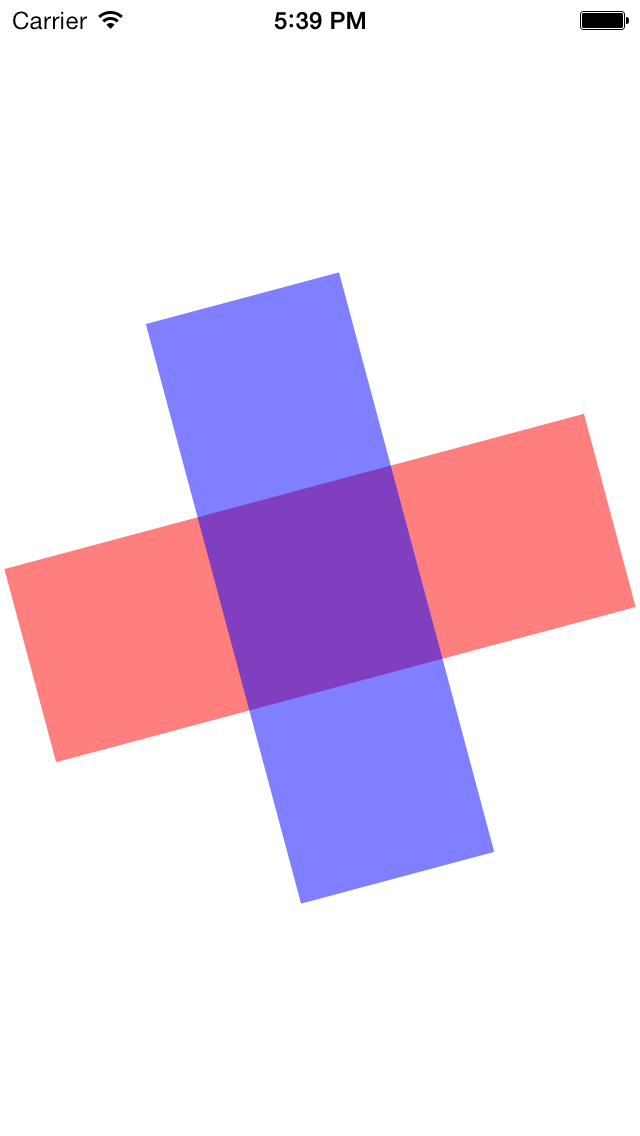
Insert the following statement imediately after the call to
CGContextTranslateCTM.
	//Rotation of 15 degrees, positive for counterclockwise.
	CGContextRotateCTM(c, 15.0 * M_PI / 180.0);
A roundabout way to do the same thing is
	CGAffineTransform rotate = CGAffineTransformMakeRotation(-15.0 * M_PI / 180.0);
	CGContextConcatCTM(c, rotate);
The three things we did to the CTM
(translate, scale, rotate)
correspond to the three functions that create and return a
CGAffineTransform
structure.
We will call these functions below in “Fill and stroke”,
and also in
animate.html.
| functions that change the CTM | functions that return a CGAffineTransform | |
|---|---|---|
| translate | CGContextTranslateCTM |
CGAffineTransformMakeTranslation |
| scale | CGContextScaleCTM |
CGAffineTransformMakeScale |
| rotate | CGContextRotateCTM |
CGAffineTransformMakeRotation |
A path can consist of more than one circle or two rectangles. Here’s a path that consists of three lines.
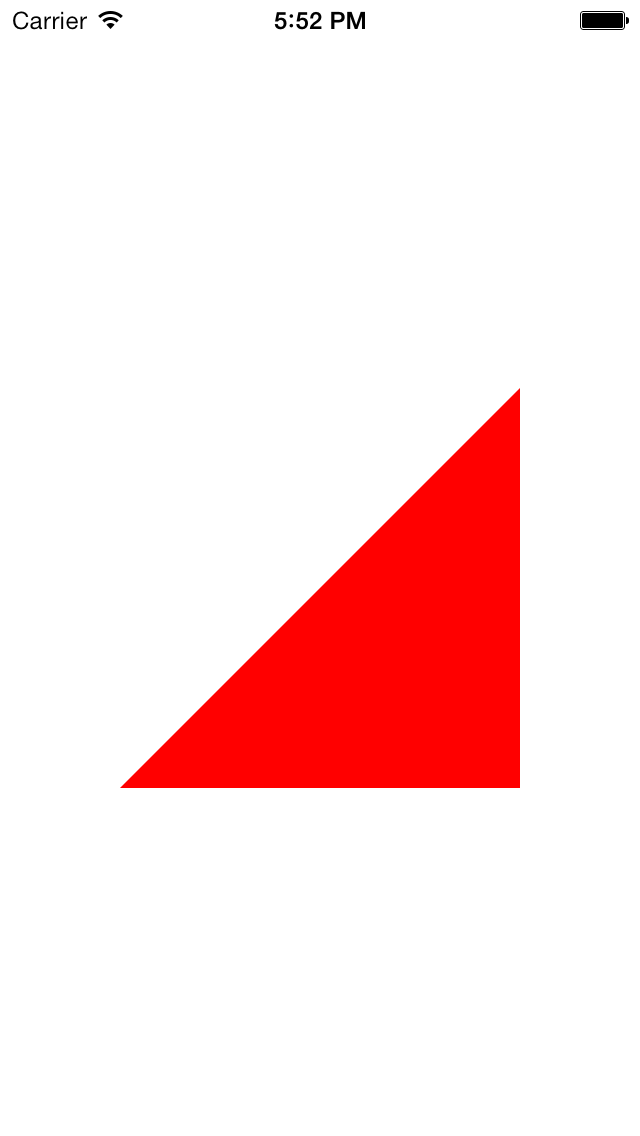
CGContextClosePath
closes the path by connecting the end point
(the lower left vertext)
to the starting point
(the lower right vertex).
This function is unnecessary here because
CGContextFillPath
closes the path automatically.
The
CGContextClosePath
would be necessary if we call
CGContextStrokePath
instead of
CGContextFillPath.
- (void) drawRect: (CGRect) rect {
	//Fill a right triangle.
	CGSize size = self.bounds.size;
	CGFloat min = MIN(size.width, size.height);
	CGFloat length = min * 5 / 8;           //of side

	CGContextRef c = UIGraphicsGetCurrentContext();

	//origin at right angle
	CGContextTranslateCTM(c,
		(size.width + length) / 2,
		(size.height + length) / 2
	);
	CGContextScaleCTM(c, 1, -1);

	CGContextBeginPath(c);
	CGContextMoveToPoint(c, 0, 0);          //lower right vertex (the right angle)
	CGContextAddLineToPoint(c, 0, length);  //upper right vertex
	CGContextAddLineToPoint(c, -length, 0); //lower left vertex
	CGContextClosePath(c);                  //back to starting point

	CGContextSetRGBFillColor(c, 1.0, 0.0, 0.0, 1.0);
	CGContextFillPath(c);
}
Change
CGContextFillPath
to
CGContextStrokePath.
You would probably also want to change
CGContextSetRGBFillColor
to
CGContextSetRGBStrokeColor,
and also call
CGContextSetLineWidth.
You could even set the
line
join
and line cap.
CGContextFillPath
and
CGContextStrokePath
erase the current path as they draw it.
To draw the same path more than once,
you must store the path in a variable of type
CGMutablePathRef.
- (void) drawRect: (CGRect) rect {
	//Fill and stroke a right triangle.
	CGSize size = self.bounds.size;
	CGFloat min = MIN(size.width, size.height);
	CGFloat length = min * 5 / 8;           //of side

	CGMutablePathRef p = CGPathCreateMutable();   //right triangle
	CGPathMoveToPoint(p, NULL, 0, 0);          //lower right vertex (the right angle)
	CGPathAddLineToPoint(p, NULL, 0, length);  //upper right vertex
	CGPathAddLineToPoint(p, NULL, -length, 0); //lower left vertex
	CGPathCloseSubpath(p);

	CGContextRef c = UIGraphicsGetCurrentContext();
	//Origin at right angle.
	CGContextTranslateCTM(c,
		(size.width + length) / 2,
		(size.height + length) / 2
	);
	CGContextScaleCTM(c, 1, -1);

	CGContextBeginPath(c);
	CGContextAddPath(c, p);
	CGContextSetRGBFillColor(c, 1.0, 0.0, 0.0, 1);
	CGContextFillPath(c);

	CGContextBeginPath(c);
	CGContextAddPath(c, p);
	CGContextSetLineWidth(c, 10.0);
	CGContextSetRGBStrokeColor(c, 0.0, 0.0, 1.0, 1);
	CGContextStrokePath(c);
	CGPathRelease(p);
}
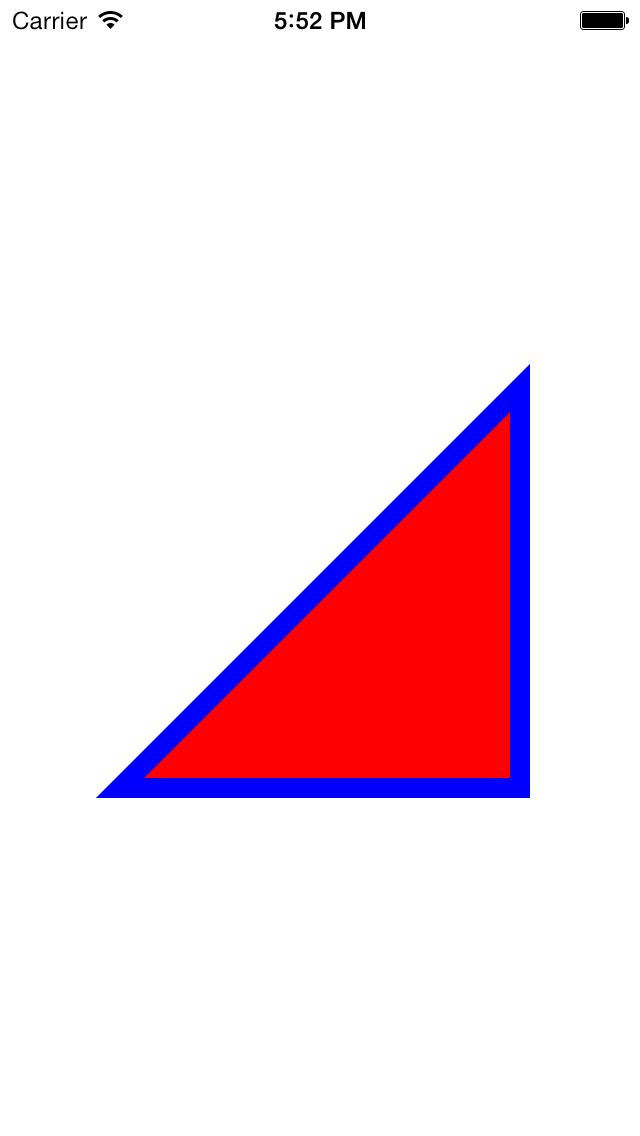
CGContextFillPath
or
CGContextStrokePath.
	//Light source at upper left, shadow at lower right.
	CGSize shadow = CGSizeMake(10, -20);

	//5 is the amount of blur.  A smaller number makes a sharper shadow.
	CGContextSetShadow(c, shadow, 5);
Combine them into one statement:
CGContextSetShadow(c, CGSizeMake(10, -20), 5);Look at the other goodies in the shadow document.
performSelector:withObject:afterDelay:
in
objective.html.
Insert the following statement
as the last statement of
drawRect:.
It will cause
drawRect:
to be called every two seconds.
[self performSelector: @selector(setNeedsDisplay) withObject: nil afterDelay: 2.0];Give class
View
some instance variables inside of
{curly braces}
in
View.h.
Each call to
drawRect:
should change the values of these instance variables,
causing
drawRect:
to draw a slightly different picture each time.